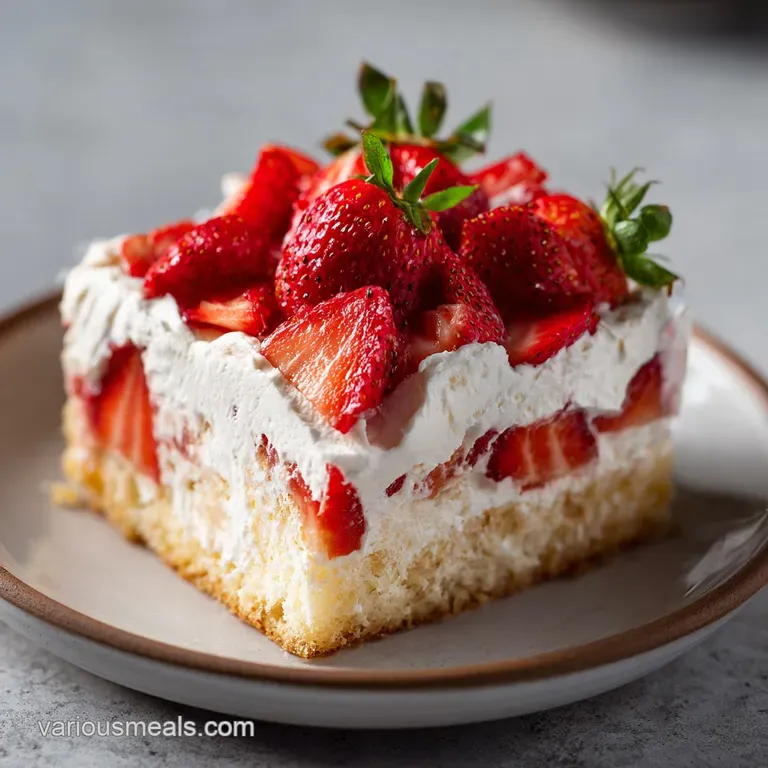
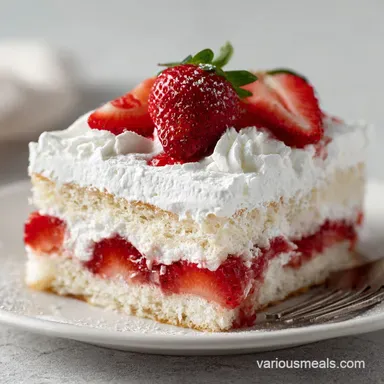
Strawberry Poke Cake: Moist and Creamy
- Time: Active 15 minutes, Passive 4 hours 30 mins, Total 4 hours 45 mins
- Flavor/Texture Hook: A velvety, cream topped sponge with a cooling strawberry burst.
- Perfect for: Summer family gatherings and nostalgic potluck celebrations.
- Crafting the Nostalgic Strawberry Poke Cake
- Why This Infusion Method Works
- Picking Your Best Recipe Specs
- Gathering Your Essential Cake Ingredients
- Essential Tools for Flawless Results
- From Prep to Golden Plate
- Solving Common Soggy Cake Problems
- Swapping Bases and Berry Flavors
- The Truth About Gelatin and "Seal" Myths
- Keeping Your Leftovers Fresh
- Perfect Pairings for Your Dessert
- Recipe FAQs
- 📝 Recipe Card
Crafting the Nostalgic Strawberry Poke Cake
The kitchen always smells best when a white cake is in the oven, doesn't it? That sweet, floral vanilla aroma starts drifting through the hallways, and suddenly everyone is hovering by the counter. In my family, this specific scent usually signaled a celebration.
Poke cakes are a beautiful piece of culinary history, rising to fame in the late 1960s and 70s across North America. They were the ultimate "community" dessert, appearing at every church basement social and backyard barbecue.
It wasn't just about the convenience of using a mix, it was about that vibrant, neon pink "jeweled" look you’d see when the first square was finally lifted from the pan.
I remember watching my grandmother use the back of a worn wooden spoon to punch holes into a steaming cake. It felt almost wrong to poke holes in something so beautifully risen, but she always promised the "magic" was in the mess. She was right. There is something deeply comforting about the tradition of a poke cake.
It’s unpretentious, meant to be shared from a single 9x13 dish, and designed to be eaten while sitting on a porch swing or a folding chair. It represents a time when dessert was about joy and bold colors rather than intricate plating.
When you make this today, you're not just making a quick treat, you're tapping into that same sense of approachable hospitality. We are taking the classic strawberry poke cake and adding a little richness with condensed milk to ensure it isn't just sweet, but genuinely creamy.
It’s the kind of recipe that reminds you that some of the best kitchen memories are built on simple techniques that have stood the test of time. Let's get into how we make this work so the sponge stays sturdy but the flavor goes deep.
Why This Infusion Method Works
Capillary Action: The holes act as vertical reservoirs, allowing the low viscosity gelatin mixture to travel deep into the crumb without turning the entire cake into mush.
Starch Stabilization: Baking the cake with whole milk and oil creates a tighter crumb structure that holds its shape even after being saturated with liquid.
Thermal Gradient: Pouring a warm liquid into a slightly cooled cake allows the starches to "drink" the infusion more effectively than if the cake were ice cold and the pores were closed.
Osmotic Balance: The addition of sweetened condensed milk increases the density of the strawberry liquid, ensuring it clings to the cake fibers rather than just pooling at the bottom of the dish.
| Servings | Pan Size | Ingredient Adjustment | Chill Time |
|---|---|---|---|
| 15 people | 9x13-inch dish | Standard recipe as listed | 4 hours (minimum) |
| 30 people | Two 9x13 dishes | Double all ingredients | 4 hours (minimum) |
| 8 people | 8x8-inch dish | Use 0.5x ingredients | 3 hours (minimum) |
The serving size calculator above helps you decide if you need to double up for a big block party or scale down for a smaller Sunday dinner. If you are making this for a crowd, I highly recommend using two separate pans rather than one giant one to ensure the gelatin distributes evenly.
Picking Your Best Recipe Specs
| Ingredient | Science Role | Pro Secret |
|---|---|---|
| 3 oz Strawberry Gelatin | Flavor & Structure | Use boiling water to fully hydrate the collagen for a clean set. |
| 0.5 cup Condensed Milk | Creamy Mouthfeel | This prevents the "wet bread" texture by adding fat to the soak. |
| 3 Large Eggs | Emulsification | Room temperature eggs incorporate faster for a more even rise. |
| 8 oz Whipped Topping | Moisture Barrier | Stabilized topping holds its peaks better in the fridge than fresh cream. |
Between these components, the gelatin is the real worker. It doesn't just provide that strawberry punch, it actually helps bind the cake together as it chills. Without it, the cake would just be a soggy mess.
But with that collagen set, you get a texture that is almost like a dense, fruit flavored fudge in certain spots.
Gathering Your Essential Cake Ingredients
To get this right, we need to be specific about our choices. A standard 15.25 oz White Cake Mix is our foundation because it provides a neutral, bright canvas for the red infusion. For the liquid, use 1 cup Whole Milk rather than water; the extra fat provides a much sturdier crumb.
You will also need 3 Large Eggs and 0.5 cup Vegetable Oil to keep the sponge moist and flexible.
For the "poke" part of the show, grab 3 oz Strawberry Flavored Gelatin and 1 cup Boiling Water to dissolve it. We balance that with 0.5 cup Sweetened Condensed Milk and 0.25 cup Cold Water to bring the temperature down and add that signature silkiness.
Finally, you’ll top the whole thing with 8 oz Stabilized Whipped Topping and 1 lb Fresh Strawberries. Why this? Fresh berries provide a tart contrast to the very sweet, creamy topping.
If you’re feeling like you want to try something a bit more from scratch for the base, you can certainly use a Strawberry Cake from Scratch method, though the classic box mix actually holds up better to the heavy liquid infusion used here.
Essential Tools for Flawless Results
You don't need a professional pastry kitchen for this, but two tools are non negotiable. First, a 9x13-inch glass or ceramic baking dish. Glass is great because you can actually see the red "veins" of the strawberry mixture through the sides, which looks incredible. Second, you need the handle of a wooden spoon.
Don't use a fork; the holes are too small and won't let enough liquid in. You want "craters," not pinpricks.
A heat proof glass jug or pitcher with a spout is also vital for the infusion stage. You need to be able to pour slowly and precisely. If you just dump the liquid on, it will run to the edges of the pan and leave the center of your cake dry.
A whisk is also better than a fork for the gelatin step to ensure every single crystal of sugar and collagen is dissolved into the boiling water.
From Prep to Golden Plate

- Preheat your oven to 350°F (175°C) and grease that 9x13-inch dish thoroughly with butter or non stick spray.
- In your largest bowl, combine the white cake mix, 1 cup whole milk, 3 large eggs, and 0.5 cup vegetable oil.
- Beat the mixture on medium speed for exactly 2 minutes. You want the batter to look smooth and slightly aerated.
- Pour the batter into the dish and bake for 28-32 minutes. Wait until a toothpick comes out clean and the top looks pale gold.
- Place the pan on a wire rack and let it cool for exactly 10 minutes. It should still be quite warm to the touch.
- Use the rounded handle of a wooden spoon to poke holes across the cake at 1 inch intervals. Aim to go about 3/4 of the way down.
- Whisk the strawberry gelatin with 1 cup boiling water in your jug until the liquid is clear and no grains remain.
- Stir in the 0.5 cup sweetened condensed milk and 0.25 cup cold water until the mixture is a smooth, creamy pink.
- Slowly pour this mixture over the cake, making sure to hit every hole. The cake will "hiss" slightly as it absorbs the liquid.
- Cover the pan and refrigerate for at least 4 hours. Wait until the cake is completely cold before adding the topping.
- Spread the 8 oz whipped topping in a thick, velvety layer and top with your 1 lb of sliced fresh strawberries.
Chef's Tip: For the cleanest slices, wipe your knife with a warm, damp cloth between every single cut. This prevents the white topping from smearing into the red interior "veins" of the cake.
Solving Common Soggy Cake Problems
Why Your Cake Is Mushy
If the bottom of your cake feels like a sponge that’s been sitting in a sink, you likely poured the liquid while the cake was straight out of the oven. At that point, the structure is too fragile and the steam traps the liquid rather than letting it soak in.
Letting it rest for those 10 minutes is the difference between a moist cake and a soggy one.
Why Your Topping Is Melting
Whipped topping can turn into a puddle if you apply it to a cake that hasn't fully chilled. The residual heat from the center of the cake will break the emulsion of the cream. Always give it the full 4 hours in the fridge. If you're in a rush, you can't shortcut this part.
| Problem | Root Cause | Solution |
|---|---|---|
| Liquid pooling at bottom | Holes weren't deep enough | Poke 3/4 through the cake to ensure even distribution. |
| Dry spots in center | Poured too quickly | Use a pitcher and fill holes individually for better control. |
| Rubbery cake texture | Over mixed the batter | Stop beating exactly at 2 minutes to avoid over developing gluten. |
If you love the flavor profile of strawberries but want something with a bit more crunch and less "soak," you might enjoy my Strawberry Ricotta Bruschetta which uses similar fresh fruit notes in a totally different format.
Common Mistakes Checklist
- ✓ Don't use a fork for poking; the holes are too narrow for the creamy jello mix to enter.
- ✓ Always dissolve the gelatin in boiling water first; cold water won't activate the setting agent.
- ✓ Pat your fresh strawberries dry after washing to prevent extra water from thinning the topping.
- ✓ Use whole milk instead of water in the cake mix for a sturdier structure that won't collapse.
- ✓ Ensure the cake is completely covered in the fridge to prevent it from picking up other food odors.
Swapping Bases and Berry Flavors
Scaling this recipe up is quite simple because it fits so perfectly into standard 9x13 pans. If you are hosting a massive party and need 30 servings, just bake two cakes simultaneously. However, when doubling the gelatin infusion, only increase the spices or extracts to 1.5x to avoid an overwhelming artificial flavor.
Swapping the Base
If you aren't a fan of white cake, a lemon cake mix works beautifully with strawberry gelatin. The acidity of the lemon cuts through the sweetness of the condensed milk. You can also use a yellow cake mix for a richer, more buttery flavor, though you’ll lose that high contrast red on-white look that makes the poke cake so famous.
Creating a dairy-free Alternative
You can swap the whole milk for full fat oat milk and use a dairy-free whipped topping (like a coconut based one). For the condensed milk, there are now excellent sweetened condensed coconut milk options available in most grocery stores.
The result will have a slight tropical hint but the texture remains almost identical.
The Truth About Gelatin and "Seal" Myths
One common myth is that you should "seal" the cake by pouring the jello over it while it's boiling hot to create a crust. This is actually counterproductive. Boiling liquid will break down the delicate crumb of the cake too fast.
You want that "osmotic mixture" we talked about a warm, slightly thickened liquid that moves slowly through the sponge.
Another misconception is that you can't use fresh fruit inside the cake. People think the enzymes in fresh strawberries will prevent the jello from setting. While this is true for pineapple or kiwi, strawberries don't have those same enzymes.
However, I still recommend keeping the fresh berries for the top because they stay crisp and bright, providing a much better sensory experience than mushy, baked berries inside a saturated cake.
Keeping Your Leftovers Fresh
Storage Guidelines
This cake actually tastes better on day two because the flavors have more time to meld. Keep it in the fridge, tightly covered with plastic wrap or a lid, for up to 4 days. After that, the strawberries on top may start to macerate and release their juices, which can make the whipped topping look a little pink and runny, though it’s still perfectly fine to eat.
Zero Waste Tips
If you have leftover fresh strawberries that are starting to look a bit soft, don't throw them away! Simmer them with a teaspoon of sugar and a splash of lemon juice to create a quick strawberry coulis. You can drizzle this over individual slices of the cake for an extra punch of flavor.
Also, if you have cake scraps from leveling the top, toast them in the oven and use them as a "crumble" garnish for yogurt or ice cream.
Perfect Pairings for Your Dessert
When serving this, I love to lean into the "creamy and cold" theme. A side of high-quality vanilla bean ice cream is a classic choice, but if you want to be a bit more sophisticated, try a dollop of creme fraiche. The slight tang of the cultured cream balances the sugar in the strawberry gelatin beautifully.
For drinks, think light and bubbly. A cold glass of prosecco or a sparkling rosé pairs wonderfully with the berry notes. If you're serving this at a family afternoon event, a homemade lemonade with a few crushed mint leaves provides that sharp, refreshing contrast that makes you want to go back for a second square of cake.
This is a "comfort food" dessert through and through, so keep the presentation simple just a clean slice, a sprig of mint, and plenty of napkins for those who can't wait to dive in.

Recipe FAQs
What is a strawberry poke cake?
A strawberry poke cake is a moist dessert made by poking holes into a freshly baked white cake. After baking, you pour a mixture of strawberry gelatin and sweetened condensed milk into the holes, allowing the liquid to infuse the cake before topping it with whipped cream and fresh strawberries.
Why is my Jello poke cake soggy?
It is likely soggy because you used too much liquid or didn't allow the cake to cool slightly before poking. Ensure you follow the measurement of exactly 1 cup of boiling water and 0.25 cup of cold water to maintain the proper structural integrity of the crumb.
What do you pour on a poke cake?
Pour a mixture of dissolved strawberry gelatin and sweetened condensed milk. Whisk the gelatin with 1 cup of boiling water until dissolved, then add 0.5 cup sweetened condensed milk and 0.25 cup cold water to create the creamy, flavorful infusion.
How do I prevent a soggy poke cake?
Use the handle of a wooden spoon to create holes at 1 inch intervals and avoid using a fork, which creates holes that are too narrow for the liquid to absorb properly. Additionally, bake the cake for 28-32 minutes at 350°F to ensure the structure is sturdy enough to hold the liquid filling.
Is it true I can use a different fruit flavor for the gelatin?
Yes, this is a common misconception that you are strictly limited to strawberry. If you enjoyed balancing flavors here, you can apply the same acid balancing technique found in our Lemon Magic Cake by choosing other fruit flavored gelatins that complement the sweetness of the condensed milk.
How do I store a strawberry poke cake?
Keep the cake tightly covered with plastic wrap or a lid and refrigerate it for up to 4 days. Because this dessert relies on capillary action to set the infusion, it often tastes even better on the second day once the flavors have fully melded.
How do I prepare the strawberries for the topping?
Hull and slice the strawberries, then pat them completely dry before placing them on the whipped topping. This step is essential because excess water from wet strawberries can thin the whipped topping and make the presentation appear runny over time.
Easy Strawberry Poke Cake
Ingredients:
Instructions:
Nutrition Facts:
| Calories | 297 kcal |
|---|---|
| Protein | 4.1 g |
| Fat | 13.8 g |
| Carbs | 40 g |
| Fiber | 0.6 g |
| Sugar | 28 g |
| Sodium | 228 mg |
