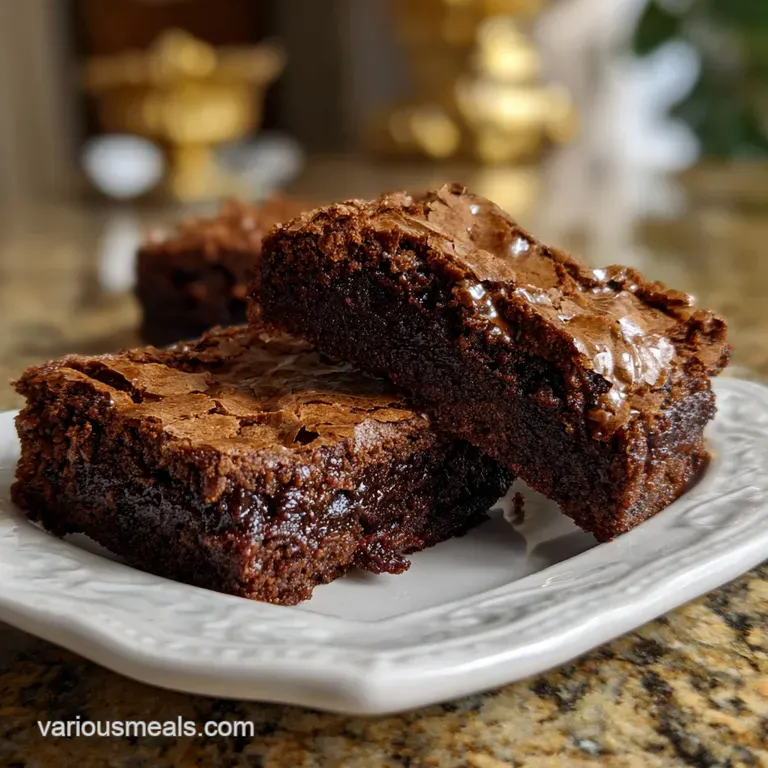
Fudge Brownies: Velvety Crumb
- Time: Active 15 minutes, Passive 25 minutes, Total 40 minutes
- Flavor/Texture Hook: Velvety crumb with a shatter thin crust
- Perfect for: Traditional Sunday family gatherings or comforting late night treats
- The Secret to Dense and Chewy Fudge Brownies
- Building Layers of Deep Cocoa Flavor
- Vital Specs for the Best Bake
- Elements for a Rich Chocolate Batter
- Necessary Tools for a Seamless Process
- The Step by Step Ritual
- Fixing Common Texture and Rise Issues
- Creative Variations for Your Table
- Storage and Leftover Care Tips
- Ideas for Beautiful Family Presentations
- Fudge Brownie FAQs
- 📝 Recipe Card
The Secret to Dense and Chewy Fudge Brownies
The aroma of melting butter swirling into dark cocoa powder is the true scent of home. There is something deeply grounding about a pan of Fudge Brownies cooling on the counter, waiting for the family to gather around.
For years, I struggled with recipes that turned out more like dry chocolate cake than the rich, fudgy treasures I craved. I realized that the secret isn't just in the ingredients, but in how we layer those flavors together to create something substantial and comforting.
When you pull these from the oven, the top should have that iconic shimmer, a delicate crust that crackles under your fork to reveal a center so dense it almost feels like a truffle. This isn't just a quick snack, it's a traditional centerpiece for a cozy afternoon.
We are looking for that specific weight in the hand and a melt in-the mouth quality that only comes from doing things the old-fashioned way.
Trust me, once you see how the batter transforms from a grainy mixture into a glossy, velvety ribbon, you’ll never go back to a pre made mix. We are building flavor from the ground up, starting with the warmth of the butter and ending with the bite of semi sweet chocolate chips.
It is a ritual of patience and high-quality staples that results in the ultimate comfort food.
Building Layers of Deep Cocoa Flavor
The beauty of this recipe lies in how we treat the cocoa. Instead of just tossing it in with the dry ingredients, we let it sit in the warm butter first. This simple act changes the entire profile of the dish.
The Science of Why it Works: High sugar and fat concentrations combined with minimal flour prevent long gluten strands from forming. This lack of structure ensures the crumb stays velvety and dense rather than rising into a light, airy cake.
- Fat Saturation: Melting the butter allows it to coat the sugar crystals and cocoa particles evenly, creating a smooth suspension.
- Maillard Reaction: The interaction between the amino acids in the eggs and the sugars at high heat creates that complex, toasted flavor on the crust.
- Sugar Recrystallization: Whisking the warm butter and sugar intensely helps the sugar dissolve and then migrate to the top during baking, forming the "shatter" crust.
- Protein Denaturation: As the eggs cook, they provide just enough structure to hold the fat and cocoa together without becoming tough.
| Method | Time | Texture | Best For |
|---|---|---|---|
| Standard Oven | 25 minutes | Classic crackly top and even bake | Traditional family batches |
| Toaster Oven | 22 minutes | Crispy edges, slightly softer middle | Small portions or quick cravings |
| Convection | 20 minutes | Very dark crust, firm edges | Those who love the corner pieces |
Choosing the right method depends on your kitchen setup, but the traditional oven remains the gold standard for that consistent, deep middle fudge texture. The toaster oven is a fantastic shortcut if you are only making a half batch, but watch it closely as the heating elements are much closer to the sugar rich surface.
Vital Specs for the Best Bake
Before we get our hands messy, let's look at the core components. Understanding the role of each staple helps you appreciate why we don't skip steps like whisking or tempering.
Ingredient Deep Dive
| Component | Science Role | Pro Secret |
|---|---|---|
| Dutch Cocoa | Provides deep color and low acidity | Sift it twice to ensure no bitter lumps remain in the batter |
| Unsalted Butter | Controls moisture and adds richness | Use warm (not boiling) butter to bloom the cocoa aromatics |
| Large Eggs | Acts as the primary emulsifier | Use cold eggs to help regulate the temperature of the warm butter |
Getting the temperature of the butter right is the first precision checkpoint. It needs to be warm enough to melt the sugar slightly but not so hot that it scrambles the eggs when they are added later. This balance is what creates the "shimmer" on the batter before it even hits the pan.
Elements for a Rich Chocolate Batter
To make these Fudge Brownies, you’ll need a few pantry staples that, when combined, become something far greater than their parts. I always keep these on hand because you never know when a neighbor might drop by or a rainy Tuesday calls for a kitchen project.
- 1/2 cup (115g) unsalted butter: Melted and warm. Why this? Provides the fat base necessary for a fudgy, non cakey texture.
- 1 cup (200g) granulated sugar: Standard white sugar works best here for the crust.
- 3/4 cup (75g) unsweetened Dutch processed cocoa powder: Why this? Dutch processed has a smoother, deeper flavor than natural cocoa powder.
- 1/4 teaspoon fine sea salt: Essential for balancing the intense sweetness.
- 2 large eggs: These should be cold from the fridge.
- 2 teaspoons pure vanilla extract: Always use the real stuff for that traditional aroma.
- 1/2 cup (65g) all purpose flour: Why this? A small amount keeps the brownies dense and chewy.
- 1/2 cup (90g) semi sweet chocolate chips: Adds pockets of melted texture.
| Original Ingredient | Substitute | Why It Works |
|---|---|---|
| Unsalted Butter | Salted Butter | Works well, just omit the 1/4 tsp of sea salt from the recipe |
| Dutch Cocoa | Natural Cocoa | Note: Will result in a lighter color and slightly more acidic, fruity bite |
| Granulated Sugar | Light Brown Sugar | Adds more moisture. Note: The top will be less crackly and more soft |
Necessary Tools for a Seamless Process

You don't need a high tech kitchen to master these treats. In fact, I prefer doing most of the work by hand with a sturdy whisk. It gives you a better "feel" for the batter as it thickens and becomes glossy.
- 8x8 inch Square Baking Pan: The ideal size for the depth we want.
- Parchment Paper: Essential for lifting the entire block out for clean slicing.
- Large Glass Mixing Bowl: Allows you to see if any flour pockets are hiding at the bottom.
- Whisk and Silicone Spatula: Use the whisk for the eggs and the spatula for the flour.
- Wire Cooling Rack: Crucial for stopping the cooking process and setting the fudge.
Chef's Tip: Grease the pan slightly before laying down the parchment paper. This acts as "glue" to keep the paper from sliding around while you are trying to spread the thick batter into the corners.
The step-by-step Ritual
Preparing homemade fudge brownies from scratch is a therapeutic process. Follow these steps closely, especially the cues for what the batter should look like at each stage.
- Prep the oven. Preheat your oven to 325°F (165°C). Note: A lower temperature prevents the edges from burning before the middle sets.
- Line the pan. Grease an 8x8 inch pan and line with parchment paper, leaving an inch of overhang on the sides.
- Melt the butter. In a large bowl, combine 1/2 cup melted warm butter and 1 cup sugar. Whisk vigorously until the mixture looks like wet sand.
- Bloom the cocoa. Sift in 3/4 cup Dutch cocoa powder and 1/4 tsp salt. Stir until the batter is dark, thick, and fragrant.
- Incorporate vanilla. Stir in 2 tsp vanilla extract. Note: Adding it now ensures it distributes evenly through the fat.
- Add the eggs. Whisk in 2 large cold eggs one at a time. Beat for 1-2 minutes until the batter becomes shiny and smooth.
- Fold the flour. Gently fold in 1/2 cup all purpose flour using a spatula. Stop as soon as no white streaks remain to avoid tough brownies.
- Add texture. Fold in 1/2 cup semi sweet chocolate chips.
- Spread and bake. Pour the batter into the prepared pan. Bake for 25 minutes until the edges are firm but the center still has a slight jiggle.
- Cool completely. Place the pan on a wire rack. Wait at least 30 minutes before slicing to allow the fudge to set.
Fixing Common Texture and Rise Issues
Even the most seasoned home cooks face the occasional baking hiccup. When you're making fudge brownies from scratch, the most common issues usually relate to temperature or over mixing.
Preventing a Dry Crumb
If your brownies come out crumbly or dry, it's almost always because they stayed in the oven too long. Remember that brownies continue to "cook" from residual heat even after you take them out.
| Problem | Root Cause | Solution |
|---|---|---|
| Cakey Texture | Too much flour or over beaten eggs | Weigh your flour and stop mixing once it disappears |
| Greasy Surface | Butter was too hot when adding sugar | Let melted butter cool for 2 mins before mixing |
| No Crackly Top | Sugar didn't dissolve enough | Whisk the sugar and butter vigorously before adding eggs |
Common Mistakes Checklist ✓ Never over bake; the center should still look slightly underdone when pulled. ✓ Sift your cocoa powder to avoid bitter, dry lumps in the finished treat. ✓ Use room temperature or cold eggs to help create the right emulsion.
✓ Don't skip the salt; it is the "volume knob" for the chocolate flavor. ✓ Use parchment paper "slings" to remove brownies without breaking the crust.
Creative Variations for Your Table
Once you've mastered the base recipe for brownies from scratch, it's fun to play with different flavor profiles. These are great for holiday gifts or just making a standard weeknight feel a bit more special.
- Sea Salt Twist: Sprinkle 1/2 teaspoon of flaky Maldon sea salt over the top immediately after taking them out of the oven.
- Walnut Crunch: Add 1/2 cup of toasted, chopped walnuts along with the chocolate chips for a traditional texture.
- Espresso Boost: Add 1 teaspoon of instant espresso powder to the melted butter to deepen the chocolate notes without adding coffee flavor.
- If you want extra chewy edges
- Use a metal baking pan instead of glass.
- If you want a "molten" center
- Under bake by 3 minutes and serve warm with a spoon.
- If you want clean, sharp squares
- Chill the brownies in the fridge for 2 hours before slicing with a hot knife.
| Stovetop (Melting) | Oven (Baking) | Why the Difference? |
|---|---|---|
| Low heat, constant stirring | Steady 325°F heat | Stovetop ensures fat and cocoa bond; Oven sets the protein structure |
| Creates the flavor base | Creates the final texture | You need both stages to achieve the "fudge" vs "cake" balance |
Storage and Leftover Care Tips
Properly storing your brownies from scratch ensures they stay velvety for days. Because of the high sugar and fat content, they actually hold up quite well compared to other baked goods.
Fridge Storage: Keep them in an airtight container at room temperature for up to 4 days. If you prefer a firmer, more fudge like bite, store them in the fridge for up to a week. The cold tightens the fat and makes them incredibly dense.
Freezing Instructions: Wrap individual squares tightly in plastic wrap, then place them in a freezer safe bag. They will stay fresh for up to 3 months. When you're ready for a treat, let them thaw on the counter for 20 minutes or give them a quick 10 second zap in the microwave.
Zero Waste Idea: If you have edges that got a little too crispy or leftovers that have gone slightly stale, crumble them up! They make an incredible topping for vanilla bean ice cream or can be folded into a batch of chocolate chip cookie dough for a "brookie" effect.
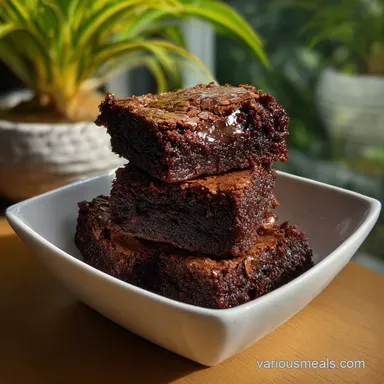
Ideas for Beautiful Family Presentations
Presentation is about making people feel cared for. When I serve homemade chocolate brownies from scratch, I love to place them on a large wooden board in the center of the table. It invites everyone to dig in and choose their favorite piece whether it's a chewy corner or a soft middle square.
For a more formal touch, dust the top with a tiny bit of powdered sugar using a fine mesh sieve. It creates a beautiful contrast against the dark chocolate crust. If you're celebrating a birthday, serve a warm square with a massive scoop of cold whipped cream or a drizzle of homemade salted caramel.
The contrast of the hot brownie and cold cream is a classic for a reason.
There's no better feeling than seeing your family enjoy the best homemade fudgy brownies from scratch you've ever made. It’s a simple pleasure that reminds us that the best things in life often come from a few humble ingredients and a little bit of time in the heart of the home. Happy baking!

Fudge Brownie FAQs
What is the secret to making fudgy brownies?
Use a high fat-to-flour ratio and bloom the cocoa. Melting butter and whisking it with sugar before adding cocoa powder intensifies flavor and creates a dense texture. Minimal flour prevents gluten development, ensuring a chewy, fudgy interior rather than a cakey one.
How to make fudge brownies at home?
Melt butter, whisk in sugar, bloom cocoa, then incorporate eggs and vanilla. Gently fold in a small amount of flour, add chocolate chips, and bake at a lower temperature (around 325°F/165°C) until the edges are set but the center has a slight jiggle.
What is the difference between a brownie and a fudge brownie?
Fudge brownies have a higher fat-to-flour ratio. This results in a denser, moister, and chewier texture, almost truffle like, compared to cake like brownies which have more flour and leavening.
What is the secret to making good fudge?
Achieve the correct sugar crystallization and temperature control. Fudge relies on cooking sugar, butter, and milk to a specific temperature, then cooling it properly to create small, smooth crystals for a creamy texture, without overworking it which can make it grainy.
Why are my brownies cakey instead of fudgy?
You likely used too much flour or overmixed the batter. Using a low-fat-to-flour ratio and overdeveloping gluten by stirring too much after adding flour will result in a cakey texture.
How do I get a crackly top on my brownies?
Whisk the sugar and butter vigorously before adding eggs. This helps the sugar dissolve and migrate to the top during baking, forming that signature thin, crackly crust. A higher sugar content also contributes to this effect.
Can I use natural cocoa powder instead of Dutch processed?
Yes, but expect a different result. Natural cocoa is more acidic and will yield a lighter colored brownie with a slightly fruitier, tangier taste. Dutch processed cocoa offers a smoother, deeper chocolate flavor and darker color.
Fudge Brownies
Ingredients:
Instructions:
Nutrition Facts:
| Calories | 161 kcal |
|---|---|
| Protein | 2.3 g |
| Fat | 8.6 g |
| Carbs | 21.6 g |
| Fiber | 1.8 g |
| Sugar | 15.3 g |
| Sodium | 46 mg |
