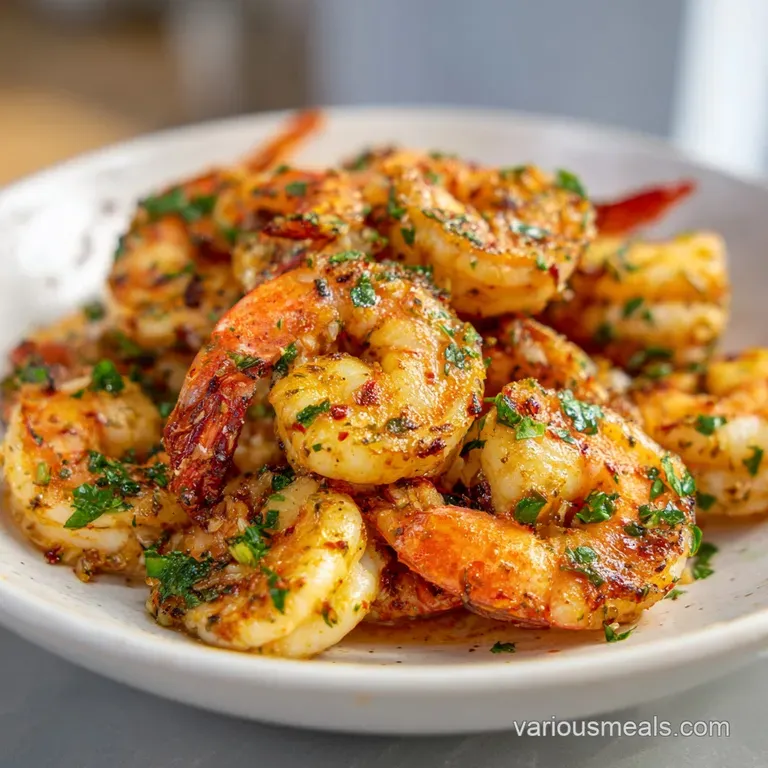
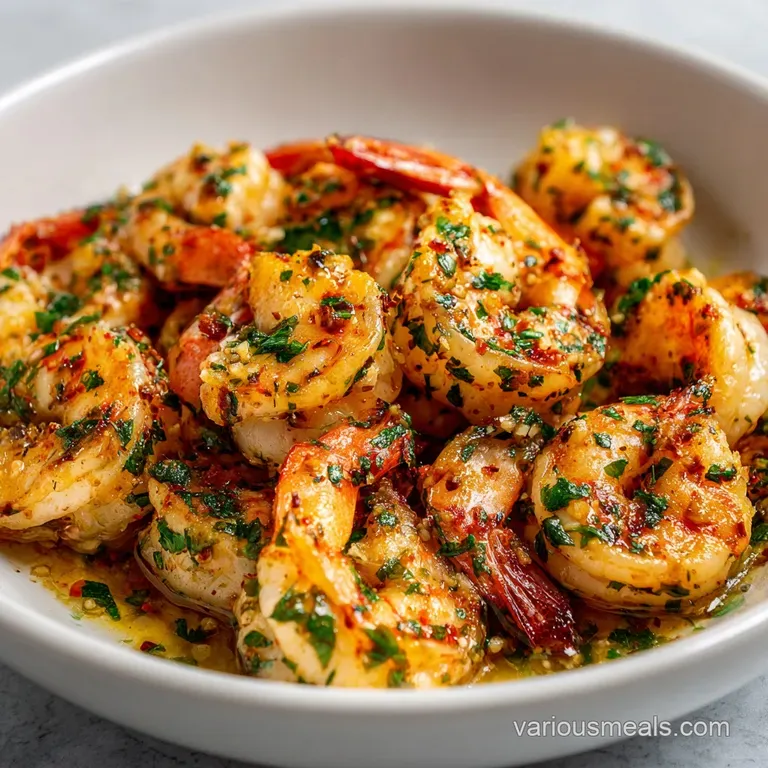
Garlic Butter Shrimp: Silky Pan Sauce
- Time: Active 5 minutes, Passive 10 minutes, Total 15 minutes
- Flavor/Texture Hook: Silky, citrus forward sauce with snappy, golden seared seafood
- Perfect for: An impressive weeknight dinner that feels like a weekend indulgence
- Creating the Ultimate Garlic Butter Shrimp
- Why This Flavor Layering Works
- Essential Details for Perfect Seafood
- Ingredients for Depth and Aroma
- Must Have Tools for over High heat Cooking
- Step-By-Step Searing and Emulsifying
- Navigating Potential Cooking Pitfalls
- Exciting Ways to Customize Flavors
- Storing and Reheating Your Meal
- Debunking Kitchen Legends
- Serving Suggestions for Success
- Recipe FAQs
- 📝 Recipe Card
Creating the Ultimate Garlic Butter Shrimp
Imagine the sound of 1.5 lbs of Large Shrimp hitting a screaming hot skillet, the immediate hiss turning into a rhythmic sizzle as the edges turn coral pink. The air in your kitchen transforms instantly, filled with the pungent, sweet aroma of cloves hitting fat.
I remember the first time I got this right, after years of serving what I jokingly called "shrimp erasers" - those rubbery, overcooked curls that happen when you're too timid with the heat.
The secret I stumbled upon wasn't a fancy spice blend or an expensive pan. It was a tiny bit of baking soda and the patience to let the garlic actually toast without burning. When you get that perfect crust on the outside while the middle stays tender and juicy, it’s a total revelation.
You’ll find yourself standing over the stove, dipping a crusty piece of bread directly into the pan before it even hits the table.
We've all been there, staring at a recipe that promises "easy" but leaves you with a broken, oily sauce and gray seafood. This version is different because we focus on the physics of the sear and the chemistry of the emulsion.
It’s approachable enough for a Tuesday night but carries enough "wow" factor to serve to guests who think you've spent hours prepping. Let's get that pan preheated.
Why This Flavor Layering Works
Alkaline Surface Tension: A tiny amount of baking soda raises the pH level on the shrimp, accelerating the Maillard reaction for better browning. This ensures a golden crust forms before the interior has a chance to turn tough or rubbery.
Thermal Momentum: Searing the seafood in two batches prevents the pan temperature from dropping, which would cause the proteins to steam in their own juices instead of browning.
Cold Fat Emulsification: Adding cold, cubed butter to the warm broth creates a stable, silky sauce. If the butter were warm or melted, it would simply separate into oil and milk solids, leaving the dish feeling heavy.
Aromatic Staggering: We add the minced garlic later in the process to prevent the tiny bits from scorching and turning bitter while the seafood finishes its sear.
| Thickness | Internal Temp | Rest Time | Visual Cue |
|---|---|---|---|
| 1.5 cm | 145°F (63°C) | 2 minutes | Opaque pink with a "C" shape |
| 2 cm | 145°F (63°C) | 3 minutes | Firm to touch, tail turns bright red |
| 2.5 cm | 145°F (63°C) | 3 minutes | Center loses all translucency |
Getting the timing right is the difference between a meal you remember and one you just chew through. If you're looking for a bigger spread, this technique works wonders alongside a Cajun Seafood Boil recipe for a full coastal feast.
Essential Details for Perfect Seafood
The success of this Garlic Butter Shrimp depends on the quality of your components and the timing of your movements. Using fresh aromatics like 6 cloves of garlic and a small shallot provides a foundational sweetness that dried powders simply can't replicate.
The broth acts as a bridge, pulling the browned bits (fond) off the bottom of the pan and turning them into the base for your sauce.
| Component | Science Role | Pro Secret |
|---|---|---|
| Baking Soda | Protein Texture | Use exactly 1/4 tsp to avoid a metallic aftertaste |
| Cold Butter | Emulsion Base | Keep it in the fridge until the very second you need it |
| Lemon Juice | Protein Tightening | Brightens the fat and cuts through the heavy butter notes |
| Avocado Oil | High Smoke Point | Prevents the butter from burning during the initial sear |
When choosing your seafood, look for the 16/20 count. This means you get 16 to 20 pieces per pound, which is the "Goldilocks" size for pan searing. They are large enough to develop a beautiful crust without overcooking in the center during the 10 minutes of total cook time.
Ingredients for Depth and Aroma
- 1.5 lbs Large Shrimp (16/20 count): Peeled and deveined. Why this? Larger sizes stay juicier during over high heat searing.
- Substitute: Scallops (adjust cook time for thickness).
- 1/4 tsp Baking soda: The browning catalyst. Why this? It creates a snappy texture by altering the protein structure.
- Substitute: Skip if necessary, but browning will be less intense.
- 1/2 tsp Kosher salt: Draws out moisture for better seasoning.
- Substitute: Sea salt (use slightly less).
- 6 cloves Fresh garlic: Split between 4 minced and 2 thinly sliced. Why this? Sliced garlic offers sweet nuggets, while minced garlic infuses the sauce.
- Substitute: Garlic paste (1 tbsp).
- 1 Small shallot: Finely diced for subtle sweetness.
- Substitute: White part of green onions.
- 1/2 tsp Red pepper flakes: For a gentle back end heat.
- Substitute: Cayenne pepper (1/8 tsp).
- 3 tbsp Unsalted butter: Must be cold and cubed. Why this? Cold fat creates a thicker, creamier emulsion in the pan.
- Substitute: Ghee (but the sauce won't be as creamy).
- 1/4 cup Low sodium chicken or vegetable broth: The deglazing liquid.
- Substitute: Dry white wine (Sauvignon Blanc).
- 1 tbsp Fresh lemon juice: To balance the richness.
- 2 tbsp Fresh Italian parsley: For herbal brightness.
- 1 tbsp Avocado or olive oil: For the over high heat sear.
Must Have Tools for over High heat Cooking
A heavy bottomed skillet is your best friend here. A 12 inch cast iron or stainless steel pan is ideal because it retains heat effectively. When you drop the cold seafood into the oil, you want a pan that doesn't lose its temperature.
If the pan cools down, the seafood will release its water and start to boil, which is the enemy of a good crust.
You will also need a pair of silicone tipped tongs. These allow you to flip each piece individually and precisely. Since we are working with a 15 minutes total time, efficiency is key.
Having your ingredients prepped in small bowls (mise en place) ensures you aren't dicing a shallot while your garlic is turning into charcoal in the pan.
step-by-step Searing and Emulsifying
- Prep the seafood. Toss the 1.5 lbs of shrimp with 1/4 tsp baking soda and 1/2 tsp salt. Note: Let them sit for 5 minutes to allow the pH change to take effect.
- Heat the pan. Add 1 tbsp oil to a large skillet over medium high heat until it begins to shimmer and smoke slightly.
- Sear the first batch. Place half the seafood in a single layer. Cook for 2 minutes until the edges are golden and opaque.
- Finish the sear. Flip and cook for 1 more minute, then remove to a plate. Note: They should be slightly underdone at this stage.
- Sauté the aromatics. Lower heat to medium. Add the shallot and the 2 sliced garlic cloves. Sauté for 2 minutes until softened and fragrant.
- Bloom the spices. Add the 4 minced garlic cloves and 1/2 tsp red pepper flakes. Cook for 30 seconds until the garlic smells nutty.
- Deglaze the skillet. Pour in 1/4 cup broth. Scrape the bottom of the pan until all browned bits are dissolved.
- Build the emulsion. Turn the heat to low. Whisk in the 3 tbsp of cold cubed butter one piece at a time until the sauce looks velvety and thick.
- Combine and finish. Return the seafood and any juices to the pan. Add 1 tbsp lemon juice and 2 tbsp parsley.
- Final toss. Coat everything in the sauce for 1 minute until the seafood is fully cooked and the sauce clings to every piece.
Navigating Potential Cooking Pitfalls
The biggest hurdle with Garlic Butter Shrimp is managing the heat. Garlic is delicate; it can go from fragrant to acrid in a matter of seconds. If your pan is too hot when you add the minced cloves, they will burn before they can flavor the oil.
Always pull the pan off the burner for a few seconds if you see the garlic turning dark brown too quickly.
Fixing Bitter Garlic Bits
If you accidentally scorch the garlic, the bitterness will permeate the entire sauce. There is no way to "un burn" it. The best move is to wipe the pan clean and start the aromatic phase over. It only takes 3 minutes, and it saves the entire meal from tasting like soot.
Fixing a Broken, Oily Sauce
If your sauce looks like a pool of yellow oil rather than a creamy coating, the heat was likely too high when you added the butter. You can often fix this by adding a teaspoon of water or broth and whisking vigorously over very low heat to re bind the fats.
| Problem | Root Cause | Solution |
|---|---|---|
| Rubbery Texture | Overcooked proteins | Remove from heat as soon as they reach a "C" shape |
| Thin, Watery Sauce | Too much broth/no emulsion | Simmer liquid longer before adding cold butter |
| Lack of Color | Overcrowded pan | Cook in two batches to maintain high surface heat |
Common Mistakes Checklist
- ✓ Pat the seafood completely dry with paper towels before seasoning (moisture prevents browning)
- ✓ Use cold butter cubes, not room temperature, to ensure a stable emulsion
- ✓ Don't skip the baking soda; it's the secret to that restaurant style "snap"
- ✓ Keep the lemon juice for the very end to preserve its bright, fresh acidity
- ✓ Stop cooking when the shrimp form a "C" shape; an "O" shape means they are overdone
Exciting Ways to Customize Flavors
If you want to turn this into a heartier meal, Garlic Butter Shrimp pasta is a classic transition. Simply double the broth and butter to create more sauce, then toss it with al dente linguine. The starch from the pasta water will help the garlic butter cling to the noodles beautifully.
This is a trick I often use when I'm stretching the meal for an extra person.
For those busy nights, you can adapt this into a sheet pan version. Toss everything except the broth and parsley on a baking sheet and roast at 400°F (200°C) for about 6 to 8 minutes.
You won't get the same deep sear as the stovetop method, but it’s a hands off approach that still delivers on flavor.
- To Scale Down: If cooking for two, halve all ingredients but use a smaller 8 inch skillet to keep the sauce from evaporating too quickly.
- To Scale Up: For a crowd, double the ingredients but cook the seafood in three or four batches. Do not double the salt immediately; start with 1.5x and adjust to taste.
- For Frozen Seafood: Thaw completely in a bowl of cold water, then pat extremely dry. Increase the initial sear time by 30 seconds as frozen seafood often retains more internal moisture.
Storing and Reheating Your Meal
Leftovers will keep in an airtight container in the fridge for up to 2 days. When reheating, avoid the microwave at all costs, as it will turn your tender seafood into rubber. Instead, place them in a small skillet over low heat with a splash of water or broth.
Cover the pan for 2 minutes until just warmed through.
To minimize waste, don't throw away those shrimp shells! Throw them into a freezer bag. When you have a few handfuls, simmer them with water, onion scraps, and a bay leaf to make a quick seafood stock. This stock is a fantastic base for a Seafood Pasta with recipe later in the week.
Debunking Kitchen Legends
One common myth is that you should leave the tails on for flavor. While the shells do contain flavor, a quick 10 minute sauté doesn't provide enough time to extract it. Leaving the tails on is mostly for aesthetics and as a "handle" for finger food.
If you're serving this over pasta or rice, feel free to remove them during prep for easier eating.
Another misconception is that you must use white wine for a "real" scampi style sauce. While wine adds a lovely acidity, a high-quality chicken broth provides a savory depth that wine sometimes lacks. Both are valid; it just depends on whether you want a sharp, bright finish or a rich, savory one.
Serving Suggestions for Success
This dish screams for something to soak up that liquid gold at the bottom of the pan. A crusty baguette is the traditional choice, but serving it over a bed of fluffy jasmine rice or even creamy polenta can turn it into a more substantial dinner.
The richness of the butter sauce is also perfectly balanced by a crisp, green side like roasted asparagus or a simple arugula salad with a light vinaigrette.
If you are looking to round out a full Mediterranean spread, this pairs beautifully with other seafood centric dishes. You might consider serving it as a warm appetizer before a main course of Shrimp Tacos with recipe if you're hosting a themed backyard dinner. The garlic and lemon profile is universal enough to fit into almost any menu.

Recipe FAQs
How to make garlic buttered shrimp?
Toss shrimp with baking soda and salt first. Heat oil until shimmering in a skillet, sear shrimp in batches until golden, then remove. Sauté minced garlic and shallots gently before deglazing with broth. Whisk in cold butter cubes slowly to create a velvety emulsion, then return shrimp to coat.
How do you pan fry shrimp with garlic and butter?
Use medium high heat and cook in small batches. Sear the seasoned shrimp quickly in oil to develop crust without overcooking the center. After removing the shrimp, lower the heat significantly before adding garlic to prevent scorching, then build the sauce base with deglazing liquid.
How does Gordon Ramsay make garlic butter?
He focuses heavily on cold butter addition at the end. Ramsay often finishes his pan sauces by swirling in cold, cubed butter off the heat to create a stable, rich emulsion rather than just melting soft butter in. If you enjoyed mastering this emulsion technique here, see how the same principle applies to creating a thick, glossy finish for Cottage Cheese Alfredo recipe.
What is the best sauce to use with shrimp?
A rich, emulsified pan sauce made from browned bits, lemon, and butter is top tier. This classic combination highlights the sweetness of the shrimp while cutting the richness with acidity. For a much heartier main course, consider the flavors in The Butter Chicken recipe and adapt the creamy elements.
Is it true I must use fresh garlic only for this recipe?
No, but fresh garlic is strongly recommended for optimal flavor depth. Fresh cloves provide a necessary sweet, nutty base when sautéed slowly. While garlic powder works in a pinch, it often burns too quickly during the initial searing phase.
Can I use olive oil instead of avocado oil for searing?
No, stick with a high smoke point oil like avocado or grapeseed. Standard extra virgin olive oil has a low smoke point and will begin to burn and taste bitter before your shrimp has properly seared.
You only want to use olive oil later, perhaps drizzled on after cooking, but not for the initial high heat step.
What is the secret to making the shrimp taste snappy and not rubbery?
Use a tiny amount of baking soda during seasoning. This raises the pH on the shrimp's surface, encouraging a faster, deeper Maillard reaction (browning) which creates a crust before the internal proteins tighten up. If you are interested in mastering protein searing and browning principles, apply this knowledge when working with large poultry cuts in our African Chicken Peanut recipe.
Garlic Butter Shrimp

Ingredients:
Instructions:
Nutrition Facts:
| Calories | 266 kcal |
|---|---|
| Protein | 34.1 g |
| Fat | 13.8 g |
| Carbs | 3.2 g |
| Fiber | 0.4 g |
| Sugar | 0.8 g |
| Sodium | 578 mg |
