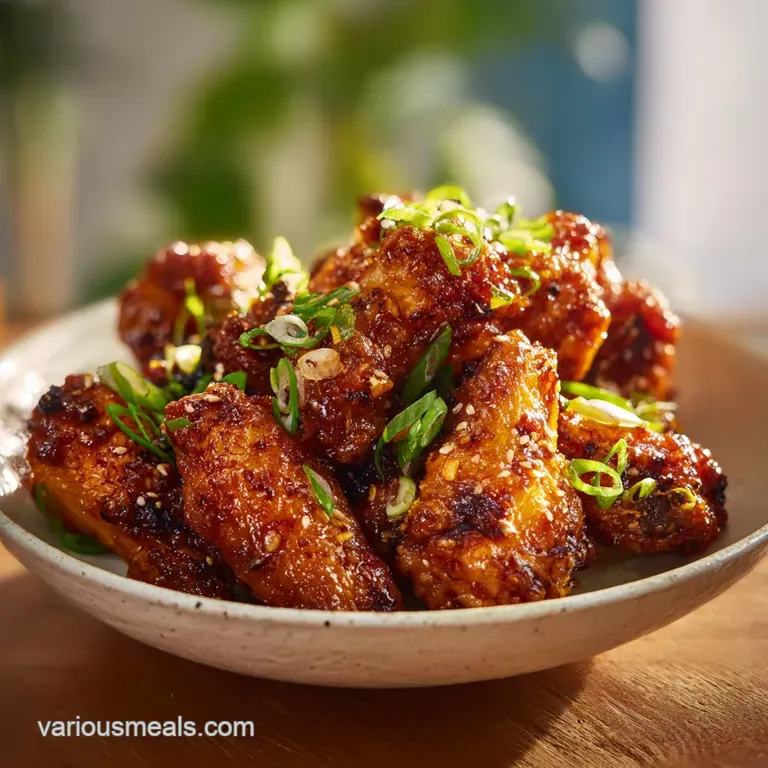
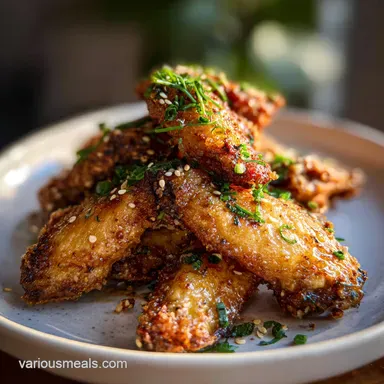
Honey Garlic Chicken Wings: Crispy and Caramelized
- Time: Active 15 minutes, Passive 45 minutes, Total 60 minutes
- Flavor/Texture Hook: Shatter crisp skin met with a velvety, mahogany garlic glaze
- Perfect for: High energy weeknight dinners or bold flavored game day spreads
- Crushing Cravings with Honey Garlic Chicken Wings
- The Secret to Shatteringly Crispy Skin
- Deep Dive Component Analysis
- Essentials for Your Bold Flavor Glaze
- Tools for Maximum Kitchen Efficiency
- How to Execute the Perfect Batch
- Avoiding Pitfalls for Better Results
- Flavor Fusions and Creative Swaps
- Myths About Honey Garlic Chicken Wings
- Storing Leftovers Without Losing Crunch
- The Best Sides for Garlic Wings
- Very High in Sodium
- Recipe FAQs
- 📝 Recipe Card
Crushing Cravings with Honey Garlic Chicken Wings
The first time I really understood the power of these wings, it wasn't even about the taste. It was the sound. I was standing in my kitchen, the air thick with the sharp, aromatic punch of fresh ginger and the deep, sweet scent of bubbling honey.
I pulled the tray out of the oven, and as the wings hit the cool air, I could hear the skin crackling and popping. It’s that specific, high frequency sizzle that tells you the fat has rendered completely, leaving behind nothing but a golden, paper thin shell.
Most people settle for soggy wings because they think they need a deep fryer to get that crunch. I used to be one of them. I’d toss wings in a heavy sauce, only to have them turn into a sad, limp mess before they even hit the table. But then I started playing with the pH of the skin.
I realized that if you treat the surface of the chicken with a bit of scientific respect, the oven does all the hard work for you. It’s an efficient way to get that fusion of sweet and savory without the greasy cleanup.
This version is all about bold tastes. We aren't doing subtle here. We’re going for a mahogany colored glaze that clings to every crevice of the wing, spiked with enough garlic to make your neighbors jealous.
When you bite into one, you get that initial shatter, followed by the silky, sticky sauce that’s been reduced until it’s almost like a savory candy. It’s a total weeknight win that feels like a high end tavern snack.
The Secret to Shatteringly Crispy Skin
Alkaline Surface Shift: Adding baking powder raises the pH level on the chicken skin, which breaks down peptide bonds and accelerates the browning process.
Moisture Extraction: The salt draws out surface moisture, while the dry heat of the oven evaporates it, allowing the skin to thin out and crisp up instead of steaming.
Convection Rendering: Elevating the wings on a wire rack allows hot air to circulate 360 degrees, ensuring the bottom stays as crisp as the top.
Viscosity Reduction: Simmering the sauce evaporates excess water from the soy and vinegar, creating a thick, concentrated glaze that sticks rather than slides.
| Thickness | Internal Temp | Rest Time | Visual Cue |
|---|---|---|---|
| Standard Wing | 165°F (74°C) | 3 mins | Juices run clear |
| Large Drumette | 175°F (79°C) | 5 mins | Skin pulls back from bone |
| Extra Large | 185°F (85°C) | 5 mins | Meat is fall off-bone tender |
There is something hypnotic about watching the honey and soy sauce meld together in the pan. As the mixture begins to bubble, the sharp, acidic bite of the apple cider vinegar starts to mellow out, replaced by a deep, caramel like aroma that fills the room.
It’s the kind of scent that brings people into the kitchen asking, "How much longer?" right as the wings are finishing their final transformation in the oven.
Deep Dive Component Analysis
| Ingredient | Science Role | Pro Secret |
|---|---|---|
| Baking Powder | Increases pH for browning | Must be aluminum free to avoid a metallic aftertaste |
| Honey | Provides sugar for caramelization | Adds the "mahogany" hue and creates the sticky texture |
| Soy Sauce | Provides salt and amino acids | Use low sodium to control the salt concentration as it reduces |
| Fresh Ginger | Breaks down proteins slightly | Grate it finely so it melts into the sauce without chunks |
Selecting the right honey makes a massive difference in the final profile. A dark, robust honey will give you a heavier, more earthy glaze, while a light clover honey keeps the focus on the garlic and ginger. I usually go for whatever is local and mid toned to ensure the balance of the Buffalo Chicken Wings style heat is present if I decide to add extra red pepper flakes later.
Essentials for Your Bold Flavor Glaze
- 2 lbs chicken wings: Split these into flats and drumettes. Why this? Even cooking and easier handling for the glaze.
- 1 tbsp baking powder: Use the aluminum free kind. Why this? It creates the bubbly, crispy texture on the skin.
- 1/2 tsp kosher salt: Use a coarse grain. Why this? Better moisture extraction without over salting.
- 1/2 tsp smoked paprika: For a hint of depth. Why this? Adds a subtle charred flavor without a grill.
- 1/2 cup honey: The base of our sticky glaze. Why this? High sugar content creates the velvety coating.
- 4 cloves fresh garlic: Minced very finely. Why this? Maximum surface area for bold garlic punch.
- 2 tbsp low sodium soy sauce: For that umami backbone. Why this? Salt control is vital during reduction.
- 1 tbsp apple cider vinegar: To cut the sweetness. Why this? Balance is everything in a bold sauce.
- 1 tsp fresh ginger: Grated into a paste. Why this? Brightness that cuts through the heavy honey.
- 1/2 tsp red pepper flakes: For a gentle heat. Why this? Adds a flicker of spice to the finish.
| Original Ingredient | Substitute | Why It Works |
|---|---|---|
| Honey (1/2 cup) | Maple Syrup (1/2 cup) | Similar viscosity. Note: Adds a woody, autumnal flavor profile. |
| Soy Sauce (2 tbsp) | Tamari (2 tbsp) | Great for gluten-free needs with the same salty umami depth. |
| Apple Cider Vinegar | Rice Vinegar | Softer acidity that complements the ginger and garlic well. |
If you find yourself running low on fresh ginger, you can use a pinch of ground ginger, though you’ll lose that bright, zesty top note. The vinegar is the one ingredient you shouldn't skip; without that acid, the honey can feel cloying and one dimensional.
It’s that little hit of sour that makes the garlic pop.
Tools for Maximum Kitchen Efficiency
To get that restaurant quality finish, you really need a rimmed baking sheet paired with a wire cooling rack. If the wings sit directly on the pan, they’ll essentially poach in their own fat, leaving the underside rubbery.
The rack allows the 425°F (220°C) air to hit every single millimeter of the skin. It’s the difference between a "okay" wing and one that has people asking for the recipe.
A small, heavy bottomed saucepan is also key for the glaze. You want something that distributes heat evenly so the honey doesn't scorch at the edges before the garlic has a chance to soften. I usually reach for a small stainless steel pot.
It lets me see the color change of the sauce clearly, which is helpful when you're looking for that specific mahogany transition.
How to Execute the Perfect Batch

- Dry the wings. Pat the chicken wings with paper towels until they are bone dry to the touch. Note: Moisture is the enemy of the shatter crunch.
- Toss with powder. In a large mixing bowl, toss the wings with baking powder, salt, and smoked paprika until every crevice is lightly and evenly dusted.
- Chill and dehydrate. Place the wings on a wire cooling rack set over a rimmed baking sheet and let sit uncovered in the refrigerator for 1 to 8 hours. Note: This air drying step is the "pro secret" for paper thin skin.
- Preheat the oven. Set your oven to 425°F (220°C) and ensure the rack is in the center.
- Bake for crunch. Bake the wings for 45 minutes, flipping them halfway through. Expect a nutty, toasted aroma as the fat renders.
- Build the glaze. While wings bake, combine honey, minced garlic, soy sauce, apple cider vinegar, ginger, and red pepper flakes in a small saucepan.
- Simmer and reduce. Heat over medium low for 5-8 minutes until the sauce looks glossy and dark.
- The final toss. Transfer the hot wings to a large bowl, pour the mahogany glaze over them, and toss immediately. Listen for the sizzle of the sauce hitting the hot skin.
Why Baking Powder Works Wonders
It seems counterintuitive to put a leavening agent on chicken, but the chemistry is solid. By raising the pH, we’re making the Maillard reaction happen at a lower energy threshold. This means the skin browns and crisps up faster than the meat can overcook.
It creates tiny micro bubbles on the surface that increase the total surface area, which is what gives you that light, airy crunch rather than a hard, leathery bite.
Achieving a Mahogany Glaze
The magic happens during the simmer. As the water evaporates from the vinegar and soy sauce, the sugars in the honey begin to concentrate. You’re looking for a specific transition where the sauce goes from a watery amber to a thick, syrupy dark brown.
If you pull it too early, it will just run off the wings and pool at the bottom of the bowl. If you wait for those slow, lazy bubbles, the sauce will cling to the wings like a second skin.
Avoiding Pitfalls for Better Results
One of the biggest mistakes I see is people using baking soda instead of baking powder. Trust me, I made that error once and the wings tasted like a chemistry set. Baking soda has a very strong, metallic, soapy flavor that will ruin your entire batch.
Always double check the label for "aluminum free baking powder" to keep the flavor clean and the texture light.
Why Wings Turn Out Salty
This usually happens if you use standard soy sauce instead of low sodium. As the sauce reduces, the salt concentration skyrockets. If you only have regular soy sauce on hand, cut the amount by a third and replace that volume with a splash of water or unsalted chicken stock.
This prevents the glaze from becoming an iodine bomb.
| Problem | Root Cause | Solution |
|---|---|---|
| Soggy Skin | Overcrowded Pan | Space wings 1 inch apart to allow airflow. |
| Burnt Garlic | Heat Too High | Simmer sauce on low; garlic should soften, not brown. |
| Thin Sauce | Not Enough Reduction | Simmer 2-3 mins longer until it coats a spoon. |
Common Mistakes Checklist
- ✓ Skipping the paper towel dry (trapped moisture equals rubbery skin).
- ✓ Using "clumpy" baking powder (sift it if you have to for an even coat).
- ✓ Forgetting to flip the wings (the rack side needs direct heat too).
- ✓ Tossing wings while they are cold (the glaze needs the heat of the wing to set).
- ✓ Over simmering the honey (it can turn into hard candy if pushed too far).
Flavor Fusions and Creative Swaps
If you’re looking to scale this down for a solo dinner, it’s remarkably easy. Just halve the ingredients and use a smaller toaster oven if you have one. For scaling up for a party, I recommend working in batches for the final toss.
If you try to coat 5 lbs of wings in one giant bowl, the ones at the bottom will get soggy before you can even plate them.
When baking for a crowd, remember that spice levels are subjective. I usually keep the red pepper flakes at the 1/2 tsp mark in the main batch and offer a side of chili oil or extra flakes for those who want that "fusion" heat. If you're looking for a side that handles the bold flavors well, a Broccoli Casserole recipe or even just some simple charred greens works beautifully to balance the sweetness of the honey.
| Method | Time | Texture | Best For |
|---|---|---|---|
| Oven Bake | 45 minutes | Uniformly crisp | Large batches/Parties |
| Air Fryer | 22 minutes | Extra bubbly skin | Quick weeknight meals |
| Convection | 35 minutes | Shatter crisp | Maximum efficiency |
Adding a Spicy Kick
For those who want a bit more "zing," try whisking in a teaspoon of Sriracha or Gochujang into the sauce during the simmer. The fermented notes of the Gochujang play incredibly well with the honey and garlic, pushing the dish into a more Korean inspired fusion territory.
Just watch the sugar content, as those pastes can burn more quickly than the honey glaze.
Myths About Honey Garlic Chicken Wings
Myth 1: You must fry them for real crunch. This is simply not true. With the baking powder technique and high heat, you can achieve a texture that rivals any deep fryer.
In fact, many people prefer the oven method because it feels lighter and doesn't leave that heavy oil aftertaste that can sometimes mask the delicate garlic and ginger notes.
Myth 2: Flour is better than baking powder for coating. Flour actually creates a heavier, more bread like crust that tends to go soft once the honey glaze hits it. Baking powder creates a much thinner, more porous surface that stays structural even when drenched in sauce.
It's about engineering the surface area rather than just adding bulk.
Storing Leftovers Without Losing Crunch
Storing wings is always a bit of a gamble, but you can keep them in the fridge for up to 3 days in an airtight container. The real trick is the reheating. Never, and I mean never, use the microwave. It will turn your beautiful shatter crisp wings into rubber.
Instead, pop them back into a 400°F (200°C) oven for about 5-8 minutes. This re crystallizes the sugars in the honey and crisps the skin back up.
For a zero waste approach, don't throw away any leftover glaze that didn't make it onto the wings. It’s an incredible base for a quick stir fry the next day. I’ve used the leftover honey garlic sauce to toss with some sautéed broccoli and shrimp, and it’s a total life saver when you're short on time.
You can also freeze the raw wings after they've been tossed in the baking powder mixture; just thaw them completely before baking so the skin can dry out again.
The Best Sides for Garlic Wings
When serving these, I like to lean into the bold tastes. A cold, crisp cucumber salad with a splash of rice vinegar and sesame oil is the perfect foil for the heavy, sweet glaze. The cooling effect of the cucumber cleanses the palate between bites, making every wing feel as impactful as the first.
If you want something heartier, a side of jasmine rice is a classic choice. It soaks up any extra mahogany sauce that drips off the wings, turning a snack into a full, efficient weeknight dinner.
I've also found that a simple slaw with a lime heavy dressing provides that necessary acidity to keep the meal feeling vibrant and fresh. These wings are the star, so keep the sides simple and focused on texture and brightness.

Very High in Sodium
1005 mg of sodium per serving (44% of daily value)
The American Heart Association recommends limiting sodium intake to no more than 2,300mg per day, with an ideal limit of less than 1,500mg per day for most adults.
Tips to Reduce Sodium
-
Omit Kosher Salt-25%
The recipe calls for 1/2 tsp of kosher salt. Omitting this entirely will significantly reduce sodium content without affecting the overall flavor profile, as other flavorful ingredients are present.
-
Use Low-Sodium Soy Sauce-15%
You are already using low-sodium soy sauce, which is great! If you can find an even lower sodium option or reduce the amount used slightly in the sauce, it can further decrease sodium.
-
Focus on Spices
Increase the use of smoked paprika, red pepper flakes, and fresh garlic and ginger. These ingredients provide excellent flavor without contributing any sodium.
-
Balance Sweetness-5%
The honey and apple cider vinegar in the sauce help to balance flavors. Ensure the sweetness from the honey is prominent enough to mask any perceived lack of saltiness.
Recipe FAQs
How to make honey garlic sauce for chicken wings?
Combine honey, minced garlic, soy sauce, apple cider vinegar, ginger, and red pepper flakes in a small saucepan. Simmer over medium low heat for 5-8 minutes until the mixture reduces into a thick, mahogany glaze.
Are chicken wings good for diabetics?
No, proceed with caution. The sauce relies heavily on honey, which is a concentrated sugar that can cause significant blood glucose spikes for many individuals.
What gives honey garlic chicken the best flavor?
Fresh aromatics are essential. Using fresh minced garlic and freshly grated ginger creates a vibrant, punchy base that bottled alternatives simply cannot replicate. If you enjoyed building this foundational flavor, see how we balance aromatics in our garlic mashed potatoes.
Do you put honey on chicken before or after cooking?
Always add the sauce after cooking. Applying a honey based glaze before baking will cause the sugars to burn and char long before the chicken is cooked through.
Why did my wings come out rubbery?
You likely skipped the dehydration step. Failing to pat the wings bone dry or skipping the 1-8 hour refrigerator rest leaves surface moisture that prevents the skin from crisping, resulting in a rubbery texture.
Is it necessary to use a wire rack for baking?
Yes, it is crucial for texture. Placing wings on a wire rack allows hot air to circulate underneath the chicken at 425°F, ensuring the fat renders properly on all sides.
Can I reheat these wings and keep them crispy?
Yes, but avoid the microwave. To restore the crunch, heat the wings in a 400°F oven for 5-8 minutes to re-crystallize the sugars in the glaze.
Honey Garlic Chicken Wings
Ingredients:
Instructions:
Nutrition Facts:
| Calories | 572 kcal |
|---|---|
| Protein | 39.4 g |
| Fat | 23.2 g |
| Carbs | 35.9 g |
| Fiber | 0.4 g |
| Sugar | 35.1 g |
| Sodium | 1005 mg |
