Lemon Magic Cake: Three Layers from One Batter

- Time: Active 20 mins, Passive 55 mins, Total 1 hour 15 mins
- Flavor/Texture Hook: Zesty lemon, velvety custard, and a delicate sponge, all in one slice.
- Perfect for: Family gatherings, comforting weekend baking, or when you want to impress without the fuss.
- Unveiling the Enigma of Lemon Magic Cake
- The Art of Layers: Why This Cake Works
- The Essence of Flavor: Key Ingredients
- Essential Tools for Your Lemon Magic Cake
- From Prep to Plate: Crafting Your Lemon Magic Cake
- Common Mistakes & Troubleshooting
- Variations & Substitutions for Your Magic Cake
- Preservation Secrets for Your Lemon Magic Cake
- How to Serve and Enjoy Your Lemon Magic Cake
- Recipe FAQs
- 📝 Recipe Card
Unveiling the Enigma of Lemon Magic Cake
Have you ever cut into a seemingly ordinary cake, only to discover a secret world of textures, a culinary illusion baked right in? That's the first moment the aroma of warm lemon zest truly hits you with this magic cake, right as it comes out of the oven. I remember the first time I made this, I was so skeptical.
How could one batter, so thin and unassuming, possibly transform into three perfect layers? The subtle sweetness, mingling with the sharp, clean scent of citrus, started to fill my kitchen, and I knew something special was happening.
My kids were watching, noses pressed against the oven door, whispering about "lemon potion." When it finally emerged, golden and puffed, then cooled to reveal its distinct layers after chilling, their eyes went wide.
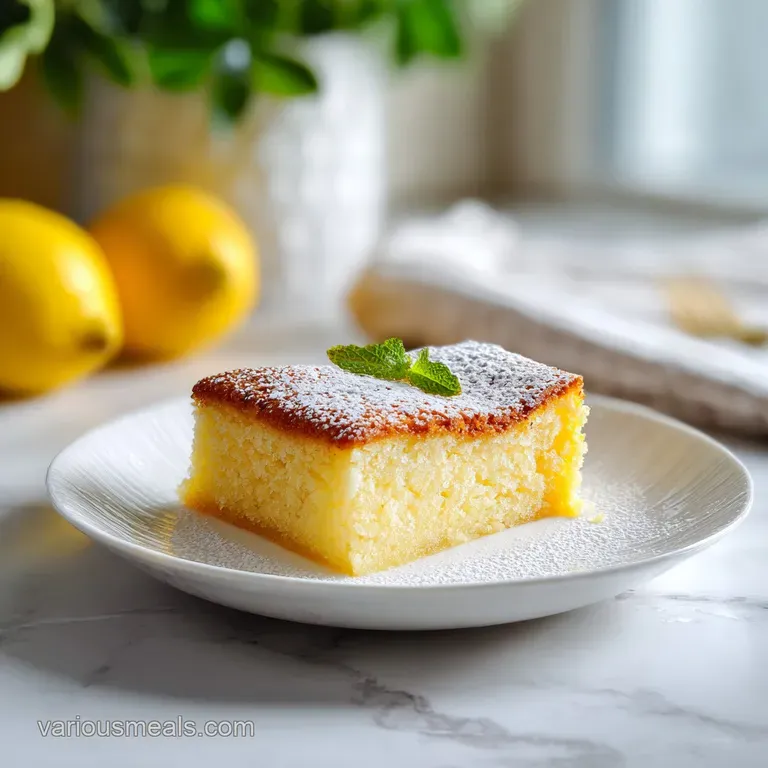
The true moment of magic, though, was when the first slice came out of the pan, revealing that impossible trifecta: a dense, rich custard at the bottom, a creamy, almost jelly like middle, and a fluffy, delicate sponge on top. It wasn't just a dessert; it was a conversation starter, a little piece of culinary wonder.
This Lemon Magic Cake isn't just a recipe; it's an experience. It’s a testament to how simple ingredients, combined with a bit of patience and understanding, can create something truly extraordinary.
Forget complicated techniques or special equipment; this homemade gem is all about gentle handling and letting the oven do its fascinating work. Trust me, once you master this, you'll feel like a kitchen wizard.
The Art of Layers: Why This Cake Works
Ever wonder how one batter turns into three distinct layers? It’s all about physics and chemistry playing nicely together in your oven!
- Density Separation: The warmed milk, egg yolks, and melted butter create a liquid batter with different densities. When baked, the heaviest parts (custard) sink, the lighter sponge forms on top, and a creamy layer settles in between.
- Egg White Aeration: Gently folding in stiffly beaten egg whites introduces air. This trapped air, when heated, expands and helps lift the top layer, creating that characteristic light, airy sponge layer.
- Slow Baking Science: Baking at a low temperature (325°F or 160°C) allows the proteins in the eggs to coagulate slowly at different rates. This slow coagulation is crucial for the distinct separation and setting of each layer without overcooking them.
- Acid Balance: Lemon juice adds a bright flavor but also helps tenderize the gluten in the flour, contributing to the delicate texture of the cake layers.
Knowing When It's Ready: A Quick Decision Guide
The magic happens in the oven, but knowing when to pull it out is key. Here's a quick look at the signs:
| Visual Cue | Internal Temp (°F) | Internal Temp (°C) | Description |
|---|---|---|---|
| Golden brown top | 185-190 | 85-88 | The sponge layer will be richly colored. |
| Edges set, center wobbly | 185-190 | 85-88 | It should still jiggle slightly, not liquidy. |
| Lightly puffed | 185-190 | 85-88 | Indicates the air in the sponge has set. |
The Essence of Flavor: Key Ingredients
Every ingredient in this Lemon Magic Cake Homemade plays a crucial part in its transformation. Don't underestimate the power of seemingly simple things!
| Ingredient | Science Role | Pro Secret |
|---|---|---|
| Eggs, Separated | Egg yolks provide richness and emulsification; whites add air and structure. | Separating when cold makes it easier, but let whites come to room temperature for maximum volume when whipping. |
| All Purpose Flour | Provides structure to the cake, especially the sponge layer. | Sifting the flour prevents lumps and ensures an even distribution, leading to a finer, more tender crumb. |
| Warm Milk | Hydrates the flour and helps create a smooth, pourable batter. | Lukewarm milk is key. Too cold, it can seize the butter; too hot, it can curdle the eggs. It helps with emulsion stability. |
| Lemon Zest & Juice | Flavor and acidity. | Zest provides aromatic oils; juice adds tang and helps tenderize, balancing the sweetness. |
Selecting Your Elements for a Moist Lemon Magic Cake
Using quality ingredients truly makes a difference in the outcome of this comforting dessert. Here's what you'll need:
- Unsalted Butter: 4 tablespoons (56g), melted and cooled slightly. Why this? Allows precise salt control and contributes richness without adding extra water.
- Granulated Sugar: 1/2 cup (100g). Why this? Sweetens the cake and helps tenderize the crumb, providing structure.
- Large Eggs: 4, separated (whites at room temperature). Why this? Provides structure, richness, and creates the distinct layers.
- All Purpose Flour: 1/2 cup (60g), sifted. Why this? Forms the cake's structure; sifting prevents lumps.
- Lemon Zest: From 2 medium lemons (about 1 tablespoon). Why this? Infuses intense, natural lemon flavor directly into the batter.
- Fresh Lemon Juice: 2 tablespoons. Why this? Adds essential tartness and helps activate certain elements for texture.
- Vanilla Extract: 1 teaspoon. Why this? Enhances the overall flavor profile, adding warmth and depth.
- Milk: 2 cups (480ml), warmed to lukewarm. Why this? Crucial for the batter's consistency and layer separation.
- Salt: Pinch. Why this? Balances sweetness and amplifies other flavors.
- Powdered Sugar: 1-2 tablespoons, for dusting (optional).
- Fresh Lemon Slices or Zest Curls: For garnish (optional).
Essential Tools for Your Lemon Magic Cake
You don't need a professional pastry kitchen to make this Magic Lemon Custard Cake. Just a few common items will do the trick:
- 9x9 inch (23x23 cm) Square Baking Pan: A non stick pan is helpful, but parchment paper works wonders for easy removal.
- Electric Mixer: Handheld or stand mixer. Essential for whipping those egg whites to stiff peaks.
- Mixing Bowls: At least two medium sized bowls, one for egg whites and one for yolks.
- Whisk: For general mixing and incorporating ingredients smoothly.
- Rubber Spatula: Critical for gently folding in the egg whites without deflating them.
- Fine Mesh Sieve: For sifting the flour, ensuring no lumps.
- Measuring Cups and Spoons: Accuracy is your friend in baking.
Comparing Baking Methods: Stovetop vs. Oven
While this Lemon Magic Cake From Scratch specifically relies on the controlled environment of an oven, it’s worth understanding why some desserts shine there compared to the stovetop.
| Method | Primary Cook Type | Typical Texture Result | Best For This Cake? |
|---|---|---|---|
| Stovetop | Quick heating, searing, boiling | Crispy, caramelized, saucy | No - lacks even, gentle heat for layer separation. |
| Oven | Gentle, even, radiant heat | Tender, set, fluffy, moist | Yes - essential for precise multi layer coagulation. |
For delicate structures like our magic cake, the oven's consistent, all around heat is indispensable. Trying to replicate the three distinct layers on a stovetop simply wouldn't yield the same velvety, comforting results.
From Prep to Plate: Crafting Your Lemon Magic Cake
Get ready to fill your kitchen with the most delightful aroma of citrus and warm vanilla as you bring this Easy Lemon Magic Cake to life. Precision and gentleness are key!
1. The Precision Prep
First, get your oven ready. Preheat it to a steady 325°F (160°C). Then, grab your 9x9 inch (23x23 cm) square baking pan. Lightly grease and flour it, or, my favorite trick, line it with parchment paper, leaving a slight overhang on two sides.
This makes lifting the chilled cake out a dream. Set it aside. Now, separate your 4 large eggs. Pop the whites into a very clean, large mixing bowl and the yolks into another medium bowl. Add a pinch of salt to the egg whites.
2. Whipping the Whites to Perfection
With your electric mixer, beat those egg whites until they form stiff, glossy peaks. This is where the magic really starts for your sponge layer. They should hold their shape when you lift the beaters. Once done, set them aside at room temperature.
They're waiting to be gently folded in later, so resist the urge to peek too much!
3. Crafting the Custard Base
In the bowl with your egg yolks, add the melted and slightly cooled 4 tablespoons (56g) of unsalted butter and 1/2 cup (100g) of granulated sugar. Beat this mixture with your electric mixer until it's light, creamy, and beautifully combined. The warmth of the butter helps create a lovely emulsion here.
Next, stir in the vibrant zest from 2 medium lemons, 2 tablespoons of fresh lemon juice, and 1 teaspoon of vanilla extract. Mix just until everything comes together. Aroma Checkpoint 1: At this stage, your kitchen should be filling with the bright, clean scent of fresh lemon.
4. The Gentle Fold and Bake
Gradually add the sifted 1/2 cup (60g) of all purpose flour to the yolk mixture, beating on low speed until it's just combined and no dry streaks remain. Seriously, avoid overmixing here; we don't want tough cake.
Then, slowly pour the warmed 2 cups (480ml) of milk into the batter while whisking continuously until the mixture is completely smooth. It will be quite thin and liquidy, which is exactly right!
Now, the delicate part: gently fold the stiff egg whites into the liquid batter. Do this in three additions using your rubber spatula. Don't overmix; you want to incorporate the whites without deflating all that precious air.
The batter should still have some foamy bits on top, signaling that lovely sponge layer is ready to form. Aroma Checkpoint 2: The batter now smells creamy and intensely lemony, a comforting promise of what's to come.
Pour the prepared batter into your pan. Carefully place the pan in your preheated oven and bake for 50-60 minutes. You're looking for a top that's golden brown, and the cake should be set but still slightly wobbly in the center.
The low and slow heat is doing its crucial work, allowing those layers to form distinctly. Precision Checkpoint 1: Bake for 55 minutes, checking for that golden top and slight wobble.
5. The Grand Reveal
Remove the cake from the oven. Aroma Checkpoint 3: Your whole home will now smell like a warm, sunny lemon grove! Let it cool completely in the pan on a wire rack. This patience is critical for the layers to set properly.
Once cooled, cover the pan and refrigerate for at least 2-3 hours, or even better, overnight. This chilling step firms up the custard and truly sets the magic. Precision Checkpoint 2: Chill for a minimum of 2 hours, or ideally 8 hours.
Once chilled, carefully lift the cake out of the pan using the parchment overhang. Dust with powdered sugar, and if you're feeling fancy, garnish with fresh lemon slices or zest curls before serving.
Precision Checkpoint 3: Slice into 8 generous pieces with a sharp knife to show off those beautiful layers.
Common Mistakes & Troubleshooting
Making this beautiful Italian Lemon Magic Cake is usually straightforward, but sometimes things don't go quite as planned. Here are a few hiccups you might run into and how to fix them.
Why Your Cake Has Watery, Undefined Layers
This is the most common issue. The "magic" relies on the layers separating. If yours are a bit muddled, it's often due to deflating the egg whites or incorrect baking temperature. The density differences need time to do their work.
| Problem | Root Cause | Solution |
|---|---|---|
| Layers don't separate | Overmixing egg whites, oven too hot/cold, not enough chilling | Fold egg whites gently. Check oven temp with thermometer. Chill thoroughly. |
| Custard too runny | Underbaked, milk not warmed, not enough chilling | Bake until set with a slight wobble. Ensure milk is lukewarm. Chill longer. |
| Sponge too dense | Overmixed flour or egg whites, too much liquid | Mix flour until just combined. Fold egg whites lightly. Follow liquid amounts. |
Why Your Cake Might Crack or Stick
Nobody wants a cake that looks like a dried up riverbed or one that refuses to leave the pan! These issues usually stem from pan prep or baking conditions.
Common Mistakes Checklist: Avoid These Pitfalls!
- ✓ Use room temperature egg whites for maximum volume.
- ✓ Ensure your mixing bowl for egg whites is impeccably clean and grease free.
- ✓ Sift the all purpose flour to prevent lumps and lighten the texture.
- ✓ Warm the milk to lukewarm; cold milk can shock the batter.
- ✓ Fold the egg whites gently and in stages; don't stir or beat them into the batter.
- ✓ Don't open the oven door too early while baking; this can cause the cake to sink.
- ✓ Chill the cake completely; this is non negotiable for the layers to set.
Variations & Substitutions for Your Magic Cake
This Lemon Magic Cake Recipe is wonderful as is, but you can definitely play with it a bit! Family favorites often start with a classic recipe and evolve.
1. Berry Burst Flavor Twist
Add 1/2 cup of fresh raspberries or blueberries to the batter after folding in the egg whites, stirring gently. The berries will sink into the middle layer, creating beautiful bursts of fruit.
2. Zesty Orange or Lime Swap
Instead of lemon zest and juice, use the zest and juice from 2 medium oranges or 3-4 limes. This will give you a completely different, yet equally delightful, citrus profile.
3. gluten-free Adaptation
Substitute the all purpose flour with a 1:1 gluten-free baking blend that contains xanthan gum. The cake might be slightly denser but will still maintain its magical layers.
4. dairy-free Delight
For a dairy-free version, swap the milk for full fat canned coconut milk (it provides similar fat content but will add a subtle coconut flavor) and use a plant based butter alternative. This would also pair beautifully with my Slow Roasted Baked Pears for a wonderfully light, fruity dessert duo.
Decision Shortcuts: Customizing Your Cake
- If you want a brighter citrus punch, add an extra teaspoon of lemon zest to the batter.
- If you prefer a richer, more decadent custard layer, use heavy cream instead of milk, but note the sponge layer might be slightly less distinct.
- If you're short on time for chilling, plan to make it the night before. Overnight chilling truly maximizes the magic layers.
Preservation Secrets for Your Lemon Magic Cake
Once you've made this incredible Quick Lemon Magic Cake, you'll want to savor every single slice. Here's how to keep it fresh and delicious.
Storage
Keep the cake, covered tightly with plastic wrap or in an airtight container, in the refrigerator for up to 3-4 days. The flavors actually deepen and meld beautifully after a day or two! The custard layer is delicate and requires refrigeration.
Freezing
You can freeze the cake, either whole or in individual slices, for up to 1 month. Wrap it tightly in plastic wrap, then a layer of aluminum foil, to prevent freezer burn. Thaw in the refrigerator overnight before serving.
Reheating
This cake is best served chilled. Reheating is not recommended as it will alter the delicate texture of the layers, especially the custard. If you prefer it less cold, just let a slice sit at room temperature for 15-20 minutes before serving.
Zero Waste Tips
- Leftover lemon rinds: Don't toss them! You can boil them with a bit of water and vinegar to create a natural kitchen cleaner, or steep them in hot water for a refreshing tea.
- Extra egg yolks: If you have extra yolks from other recipes, you can save them for this cake, or use them to make a rich pasta carbonara for dinner.
- Stale cake: While unlikely with this deliciousness, if a tiny bit dries out, crumble it over yogurt or ice cream for a delightful topping.
How to Serve and Enjoy Your Lemon Magic Cake
This Lemon Magic Cake is a showstopper on its own, its distinct layers making it look like you spent hours on a complicated dessert. For a truly indulgent experience, I love to serve it with a dollop of softly whipped cream or a small scoop of vanilla bean ice cream.
The cool creaminess provides a beautiful contrast to the cake's velvety and airy textures.
A simple dusting of powdered sugar is always elegant, but if you want to add a little more flair, a few fresh berries (strawberries or blueberries work wonderfully) add a pop of color and freshness. Or, for another delightful lemon infused treat, consider serving alongside my Homemade Strawberry Cake for a vibrant dessert spread at your next family gathering. No matter how you present it, this cake is sure to be a delightful surprise and a comforting favorite at any table.

Recipe FAQs
Why is my Lemon Magic Cake liquidy after baking?
No, it should be fully set but slightly wobbly. A very liquidy result usually means the egg whites were deflated during folding, or the oven temperature was too low for the reaction to set properly.
How long should I bake the cake for proper layer separation?
Bake for 50 to 60 minutes at 325°F (160°C). The low and slow heat is essential because it allows the heavier milk/yolk mixture to sink while the air from the egg whites rises to form the sponge top.
Is it true that I must chill the cake for a minimum of 4 hours?
No, 2 to 3 hours is the minimum time required. However, the texture and custard layer improve significantly if you chill it overnight, as the layers fully firm up and meld together.
Can I substitute whole milk with a non-dairy alternative?
No, I strongly advise against substituting the milk. The fat content and protein structure of whole milk are crucial for achieving the necessary liquid consistency that separates into the three distinct layers during baking.
How should I store leftover Lemon Magic Cake?
Keep it covered tightly in the refrigerator for up to 4 days. The custard layer is delicate and requires refrigeration; the flavors often deepen and improve after the first day of resting.
What is the secret to getting stiff peaks from the egg whites?
Ensure the mixing bowl is impeccably clean and completely free of fat. Even a tiny trace of yolk or grease will prevent the egg whites from reaching the necessary stiff peaks needed for lift.
What is the proper serving temperature for this dessert?
Serve the cake thoroughly chilled, dusted with powdered sugar. Chilling is necessary for the custard to set firm, but if you enjoy firm, crisp textures, try chilling it even longer, perhaps comparing the texture control to what you use when making a no-bake cheesecake crust.
Lemon Magic Cake Recipe
Ingredients:
Instructions:
Nutrition Facts:
| Calories | 202 kcal |
|---|---|
| Protein | 6.0 g |
| Fat | 10.4 g |
| Carbs | 21.6 g |
