No Knead Crusty Bread Recipe
- Time: Active 15 minutes, Passive 45 minutes, Total 1 hour
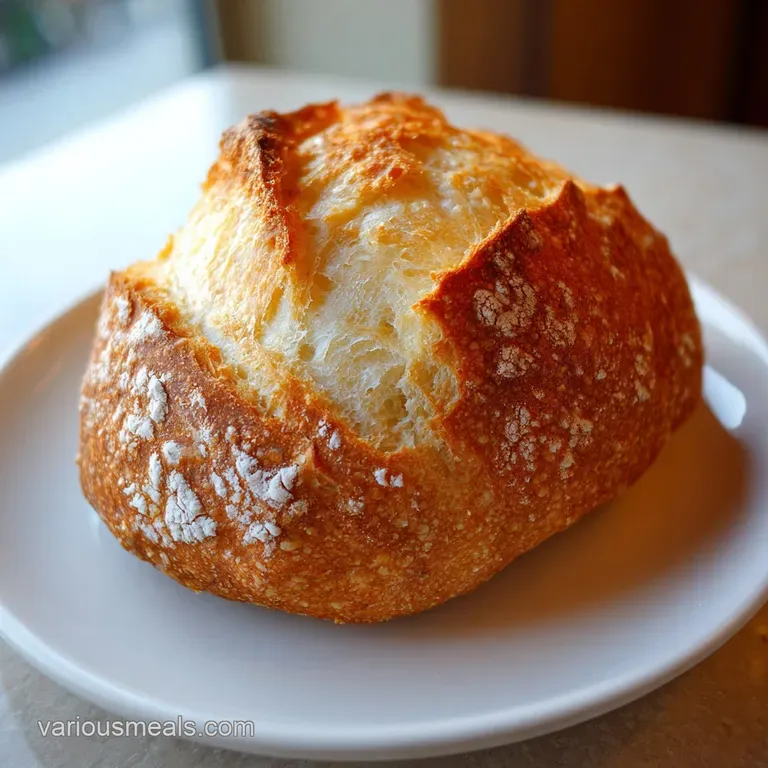
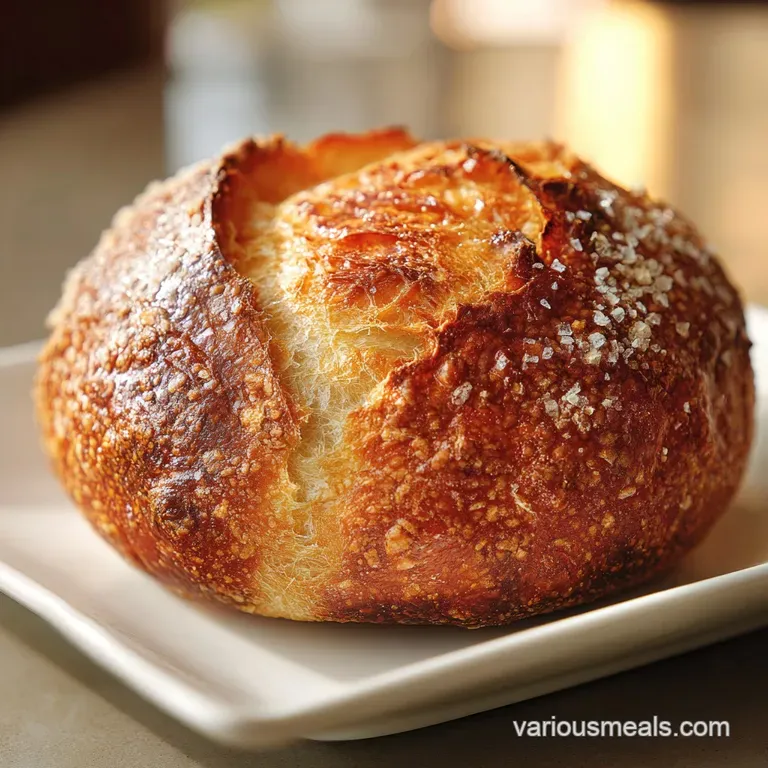
- Flavor/Texture Hook: A deep, malty flavor with an open, airy interior and a golden, crackling crust.
- Perfect for: Traditional family meals, serving with comforting stews, or a simple butter and jam breakfast.
- Make-ahead: Dough can ferment in the fridge for up to 3 days for ultimate flavor.
- The Secret to Truly Irresistible Crusty Bread
- Why This Recipe Works: Science in Your Kitchen
- Unpacking the Simple Magic of Bread Elements
- Your Essential Toolkit for Rustic Loaves
- Crafting Your Own Hearth Baked Masterpiece
- How to Fix Common Problems
- Twists and Clever Swaps for Your Bake
- Keeping Your Loaf Fresh and Fabulous
- Pairing Ideas
- Recipe FAQs
- 📝 Recipe Card
The Secret to Truly Irresistible Crusty Bread
Have you ever wondered what makes a truly magnificent loaf of crusty bread, the kind with that shatter-crisp crust and an interior so open and airy it practically sighs when you slice it? For years, I chased that elusive magic, thinking it required fancy equipment or a lifetime of professional training.
My early attempts were, shall we say, more like dense bricks than ethereal clouds. I'd rush the process, hoping to shortcut my way to glory, only to end up with a pale, soft crust and a crumb that was more akin to chewing gum.
The turning point came when I stumbled upon the "no knead" philosophy. It felt almost too simple, too good to be true. Could just mixing ingredients and letting time do its thing really yield such a profound transformation?
The idea of minimal intervention, letting the dough just be, flew in the face of everything I thought I knew about bread making. It was a revelation, and it's the trick that transformed my home baking from "okay" to "oh my goodness, you made this?!"
This particular crusty bread recipe is a love letter to that simplicity, a celebration of time and temperature working together to build incredible layers of flavor. We're talking about a bread that's humble in its ingredients but rich in character, a staple that elevates any meal.
Get ready to experience the satisfying sound of that crust giving way to a tender, honeycomb interior. It's truly a game changer for any home cook looking to bring that artisanal touch to their kitchen without breaking a sweat.
Why This Recipe Works: Science in Your Kitchen
Making this rustic crusty bread recipe isn't just about following steps, it's about harnessing a bit of kitchen science. Understanding these principles helps you troubleshoot and even adapt for your best bake every time.
- Autolysis (Initial Hydration): When you first mix the flour and water, the flour proteins (glutenin and gliadin) begin to hydrate. This initial soak allows them to naturally bond and form gluten strands without any kneading, leading to a tender, open crumb.
- Slow Fermentation (Flavor Development): The instant yeast slowly consumes the sugars in the flour, producing carbon dioxide that creates those airy pockets and alcohol byproducts that contribute to the bread's deep, complex flavor. A longer fermentation (8-12 hours) allows for more complex flavor compounds to form, layering a rich, slightly tangy taste.
- High Heat & Steam (Crust Formation): Baking at 230°C (450°F) with initial steam creates a moist environment. This keeps the crust soft long enough for the dough to expand rapidly (oven spring), while the steam gelatinizes the starch on the surface. When the steam is released (by removing the lid or water pan), the high heat then rapidly dries and browns this gelatinized surface, leading to that characteristic shatter-crisp, mahogany crust.
- Cooling (Structure Setting): Allowing the loaf to cool for 1-2 hours is crucial. During this time, the internal moisture redistributes, and the starch structure fully sets. Slicing too early traps steam, resulting in a gummy, dense crumb.
| Method | Time (active) | Texture | Best For |
|---|---|---|---|
| Dutch Oven | 15 mins | Deep mahogany crust, even rise | Consistent, professional looking crusty bread |
| Baking Sheet | 15 mins | Slightly less even rise, still crisp | No special equipment, still a great result |
| Cold Ferment | 15 mins | More complex flavor, chewier crumb | Advanced flavor, meal prep, longer shelf life |
Unpacking the Simple Magic of Bread Elements
This easy crusty bread recipe relies on a handful of humble ingredients. Each plays a crucial role in building the layers of flavor and texture we're aiming for.
| Ingredient | Science Role | Pro Secret |
|---|---|---|
| Bread Flour | High protein for strong gluten network. | Higher protein (12-14%) creates more robust gluten, essential for the chewy texture and open crumb of crusty bread. |
| Warm Water | Hydrates flour, activates yeast. | Optimal temperature (38-40°C) ensures yeast activity without killing it. Hydration is key for gluten development. |
| Instant Yeast | Leavening agent, flavor producer. | Instant yeast doesn't need proofing; it works directly with the flour's sugars to create gas and fermented notes. |
Here's what you'll need to gather:
- 500g bread flour Why this? Its higher protein content (compared to all purpose) develops the strong gluten needed for that signature chew and open crumb.
- 375g warm water (38-40°C) Why this? Just the right temperature to activate the yeast without shocking it, ensuring a lively fermentation.
- 8g instant yeast Why this? This convenient yeast gets to work immediately, simplifying the no knead process and contributing to flavor.
Your Essential Toolkit for Rustic Loaves
You don't need a fancy bakery setup to make homemade crusty bread. A few basic kitchen items are all you'll truly need.
For the Dough's Foundation (Metric & US Customary)
You'll definitely need:
- A large mixing bowl (big enough for the dough to expand at least two fold).
- A wooden spoon or sturdy spatula for mixing.
- Plastic wrap or a damp kitchen towel to cover the bowl.
- A kitchen scale for precise measurements. Trust me, baking is a science, and grams are your best friend here!
- A bowl scraper or flexible spatula for gently releasing the dough.
For Baking for Ultimate Oven Spring
For that signature crusty bread look and feel, a Dutch oven is highly recommended, but not strictly required.
- Dutch Oven (2-3 L capacity): This is my secret weapon for creating that intensely crisp, dark crust. The enclosed environment traps steam, mimicking a professional oven. I use my trusty 5 liter Lodge Dutch oven.
- OR a heavy bottomed baking sheet: If you don't have a Dutch oven, a sturdy baking sheet lined with parchment paper will work. You'll need an additional shallow pan for water to create steam in the oven.
For Cooling for Optimal Texture
- A wire rack is crucial for cooling. It allows air to circulate around the entire loaf, preventing a soggy bottom and ensuring that all important crisp crust.
Crafting Your Own Hearth Baked Masterpiece
Making a no knead crusty bread recipe is incredibly satisfying. It’s a slow dance between simple ingredients and time. Here’s how we build those amazing flavor layers.
Phase 1: Mixing for Minimal Effort
- Combine Ingredients: In a large bowl, gently combine the 500g bread flour, 375g warm water (38-40°C), and 8g instant yeast using a spoon or spatula. Note: Mix just until a shaggy dough forms and no dry flour remains. Overmixing at this stage can start developing too much gluten too quickly, making the dough less extensible for the long ferment. Do not knead it.
- First Fermentation: Cover the bowl tightly with plastic wrap or a damp cloth. Let the dough ferment at room temperature for a minimum of 2 hours 30 minutes. Note: For a more profound, nuanced flavor development and an even better texture, let it ferment for 8-12 hours, or even longer in the fridge for up to 3 days. This is where the magic happens and the crusty bread truly gets its character. The dough should significantly expand and be bubbly.
Phase 2: Shaping for Structure and Aesthetic
- Gentle Shaping: Lightly flour your work surface and gently scrape the dough out of the bowl. Note: Avoid pressing out the air; those bubbles are precious! They contribute to the open, airy crumb. With lightly floured hands, gently fold the edges of the dough towards the center a few times to form a rough round loaf. > Chef's Note: Think of shaping less as forcing the dough and more as coaxing it. Gentle handling preserves the gas built up during fermentation, which directly translates to a more open, airy crumb.
Phase 3: Preheating for Ultimate Oven Spring
- Preheat Oven & Dutch Oven (Optional): If using a Dutch oven, place it in your oven and preheat both to 230°C (450°F) for at least 30 minutes. Note: This ensures the Dutch oven is scorching hot, which provides an immediate burst of heat to the dough (oven spring) and helps create that wonderful crust. If not using a Dutch oven, preheat oven to 230°C (450°F) with a shallow baking pan on the bottom rack for steam. > Pro Tip: Don't skimp on preheating the Dutch oven. That initial blast of high, even heat is critical for a good oven spring and a crusty bread that truly shines.
Phase 4: Baking for a Mahogany Crust
- Bake with Steam (Initial Phase) - Dutch Oven Method: Carefully transfer the shaped dough into the preheated Dutch oven. Cover with the lid and bake for 30 minutes. Note: The lid traps steam released by the dough, creating a humid environment that allows the crust to remain pliable and expand before hardening.Baking Sheet Method: Carefully transfer the shaped dough to a parchment lined baking sheet. Pour 250ml (1 cup) of boiling water into the shallow pan on the bottom rack to create steam. Bake for 30 minutes.
- Bake for Crisp Crust (Final Phase) - Dutch Oven Method: Remove the lid from the Dutch oven and continue baking for another 15 minutes. Note: Removing the lid allows the trapped steam to escape, letting the crust dry out and turn a deep, golden mahogany. It should be firm to the touch and sound hollow when tapped.Baking Sheet Method: Carefully remove the pan of water from the oven. Continue baking the bread for another 15 minutes, or until the crust is a deep mahogany color and shatters easily. > Precision Checkpoint 1: Aim for an internal temperature of 93-99°C (200-210°F) for a perfectly baked loaf.
Phase 5: Cooling for Optimal Texture
- Cool Completely: Carefully remove the finished loaf from the oven and transfer it to a wire rack. Note: This is one of the hardest parts, but so important! Rushing it results in a gummy texture. Let it cool for at least 1-2 hours before slicing to allow the interior to set. > Precision Checkpoint 2: Cool for a minimum of 1 hour. Patience really pays off here. > Precision Checkpoint 3: The crust should shatter with a satisfying sound when tapped, indicating it's done.
How to Fix Common Problems
Even experienced bakers run into snags. Here's how to troubleshoot some common issues with your homemade crusty bread.
Why Your Crusty Bread Has a Dense Interior
If your bread feels heavy and lacks those airy pockets, it's often a sign that the yeast wasn't as active as it needed to be or the gluten didn't develop enough structure.
| Problem | Root Cause | Solution |
|---|---|---|
| Dense crumb | Under proofed dough or inactive yeast. | Ensure water temperature is correct (38-40°C). Extend fermentation time, especially in a cool kitchen. |
| Gummy texture | Sliced too soon. | Always let the bread cool completely on a wire rack for 1-2 hours to allow moisture to redistribute. |
| Pale crust | Not enough heat or steam escaped too early. | Preheat oven longer (at least 30 mins) with Dutch oven. Ensure a good seal on your Dutch oven lid. |
Common Mistakes Checklist
- ✓ Use warm (not hot!) water to activate yeast; too hot will kill it.
- ✓ Measure ingredients by weight for accuracy, especially flour and water.
- ✓ Don't skip the long fermentation; it's essential for flavor and texture.
- ✓ Avoid pressing out the air when shaping; be gentle to preserve bubbles.
- ✓ Ensure your oven and Dutch oven are fully preheated for maximum oven spring.
- ✓ Let the bread cool completely before slicing for the best texture.
Twists and Clever Swaps for Your Bake
This crusty bread recipe is wonderful as is, but it's also a fantastic canvas for creative variations.
- For Herbaceous Notes: Add 1-2 tablespoons of dried rosemary or thyme with the flour for a fragrant loaf. This works particularly well with this traditional crusty bread.
- For a Whole Grain Boost: Substitute up to 100g of bread flour with whole wheat flour. Note: This will result in a denser crumb and may require an extra tablespoon of water as whole wheat flour absorbs more liquid. It also adds a deeper, nuttier flavor layer.
- For a Gluten Friendly Alternative: While not truly gluten-free, some have experimented with gluten-free bread flour blends. Note: The texture will be significantly different, likely denser and less airy, and it won't achieve the same gluten structure.
- For a Vegan Approach: This recipe is naturally vegan! No animal products are needed for this simple, satisfying bread.
Comparison: Fast vs. Classic Approach
| Feature | Fast (1-2 hr ferment) | Classic (8-12 hr ferment) |
|---|---|---|
| Flavor Depth | Mild, yeasty | Complex, nutty, subtly tangy |
| Crumb Texture | Slightly tighter, less open | More open, airy, chewy |
| Planning Required | Spontaneous baking | Overnight or day long planning |
| Recommended for | Quick weeknight need | Best crusty bread experience, flavor layers |
If you're interested in more quick and easy meals, you might enjoy my Ready in 20 Minutes recipe for another simple, comforting dish.
Decision Shortcut: If you want... ...the deepest, most complex flavor, opt for the 8-12 hour fermentation. ...a slightly denser but still delicious loaf in a hurry, stick to the 2 hours 30 minutes minimum.
...to make sandwich bread, add a bit of olive oil (1-2 tbsp) to the dough for extra softness.
Keeping Your Loaf Fresh and Fabulous
A freshly baked loaf of crusty bread is a joy, but how do you keep it that way?
To Maintain Freshness
- Store the cooled loaf at room temperature in a paper bag or a breathable linen bread bag for up to 2-3 days. Note: Plastic bags will make the crust soft and rubbery.
- For a longer crispness, cut the loaf in half and store it cut side down on a cutting board, covered with a clean kitchen towel.
For Long Term Enjoyment
- Freezing: Slice the cooled bread or wrap the whole loaf tightly in plastic wrap, then aluminum foil. It can be frozen for up to 2 months. Note: Thaw at room temperature. Sliced bread can be toasted directly from frozen.
For a Warm, Crusty Revival
- Reheating: To bring back that glorious shatter-crisp crust, preheat your oven to 180°C (350°F). Lightly spritz the loaf with water (just a little!) and bake for 5-10 minutes, or until warmed through and crisp.
Pairing Ideas
This best crusty bread recipe isn't just a sidekick; it's a star that enhances almost anything you pair it with.
For a Hearty Meal
- Soups and Stews: There's nothing quite like tearing off a hunk of warm crusty bread to sop up the last bits of a rich beef stew or a creamy tomato soup. It's the ultimate comfort food pairing.
- Charcuterie Boards: This bread is the perfect vehicle for cheeses, cured meats, and olives. Its neutral, slightly tangy flavor provides a wonderful contrast to rich, savory toppings. If you love creating boards, you'll adore my Mediterranean Mezze Platter Flavor recipe.
- Open faced Sandwiches: Toast thick slices and top with avocado and a poached egg, or your favorite deli meats and cheeses for a satisfying lunch.
For a Light Bite
- Butter and Jam: Sometimes, the simplest pairings are the best. A slice of warm, freshly baked crusty bread with good quality butter and homemade jam is pure bliss.
- Olive Oil and Balsamic: A drizzle of good olive oil and a splash of balsamic vinegar makes for an elegant appetizer or a simple snack.
- Bruschetta: Lightly toast slices, rub with garlic, and top with fresh diced tomatoes, basil, and a touch of olive oil for a classic Italian treat.

Recipe FAQs
What kind of bread is considered crusty?
Any loaf with a thick, hard, and brittle exterior layer. Artisan breads like Baguettes or Boules achieve this primarily through high heat baking, often incorporating steam during the initial baking phase.
What is the name of the famous long crusty bread?
The most famous is the French Baguette. This long, thin loaf is specifically designed to maximize crust surface area relative to the soft interior crumb.
How to make simple crusty bread?
Combine 500g flour, 375g warm water (100-105°F), and 8g yeast until shaggy. Allow this dough to rest covered for 2 hours 30 minutes minimum, then gently shape it into a round loaf and bake at 450°F (230°C).
How to make bread more crusty?
Bake in a preheated Dutch oven or introduce steam during the initial bake. The initial phase requires high heat (450°F/230°C) and moisture for the first 30 minutes, followed by 15 minutes uncovered to dry and crisp the exterior.
Why is my crust soft instead of crunchy?
This usually means the bread was sliced before cooling completely. Cutting hot bread traps steam inside, which softens the crust as it condenses; let the loaf rest on a wire rack for 1-2 hours first.
Is it true that a long fermentation is necessary just for flavor?
No, it is essential for both flavor and structure. The slow fermentation breaks down starches, which contributes to the airy, open crumb structure, similar to the slow dough handling required for a good pizza base.
What is the most crucial step for good oven spring?
Ensure your oven and baking vessel are fully preheated to 450°F (230°C) for at least 30 minutes. The instant thermal shock from the hot environment causes the trapped gases in the dough to rapidly expand, creating loft.
No Knead Crusty Bread

Ingredients:
Instructions:
Nutrition Facts:
| Calories | 231 calories |
|---|---|
| Protein | 8.8 grams |
| Fat | 0.8 grams |
| Carbs | 45.7 grams |
