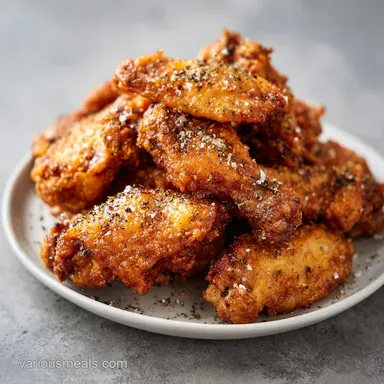
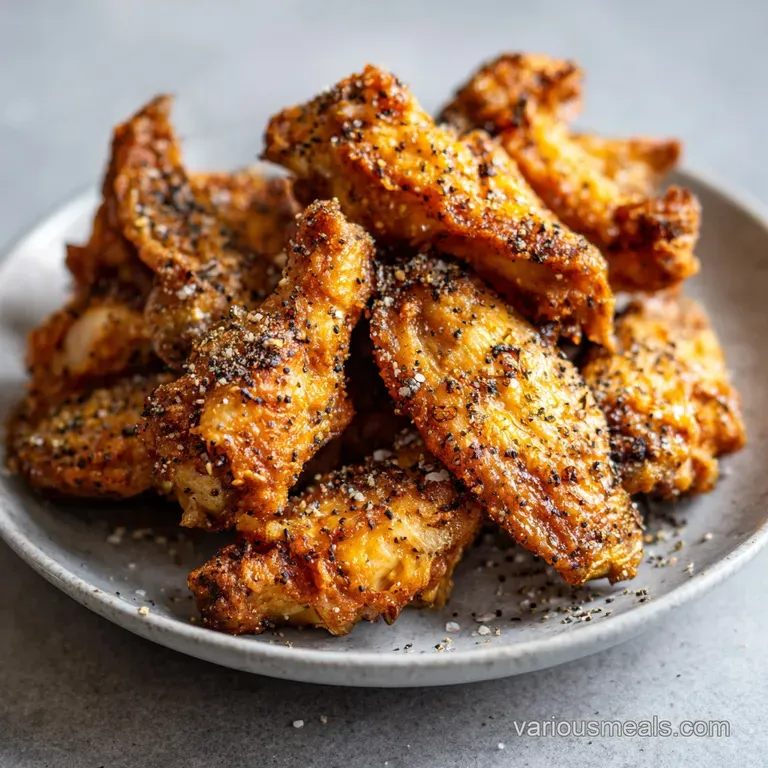
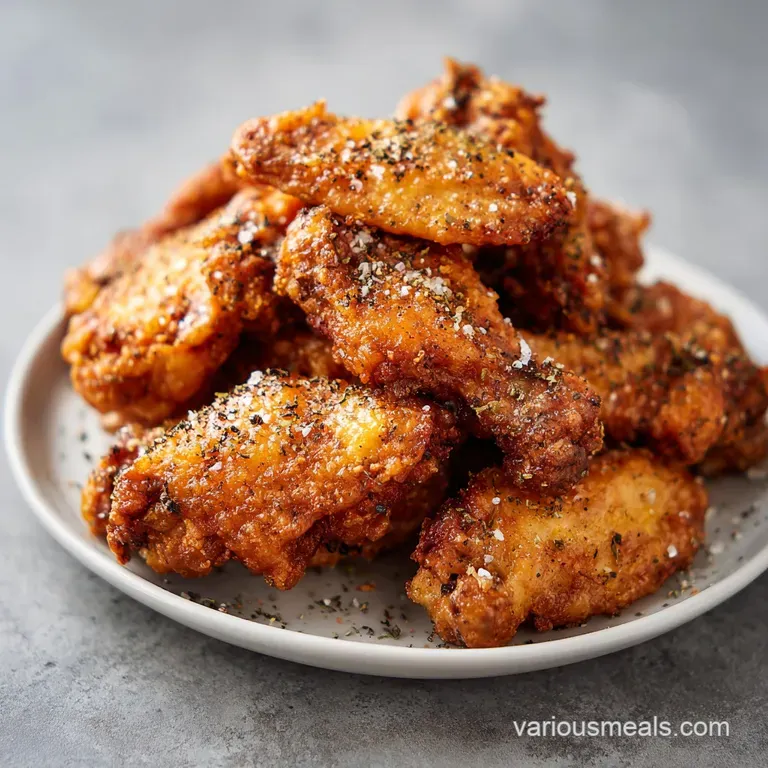
Crispy Baked Salt and Pepper Chicken: Shatter Crisp Skin
- Time:10 minutes active + 42 minutes baking = Total 54 minutes
- Flavor/Texture Hook: Shatter crisp skin with a punchy, aromatic garlic and chili finish
- Perfect for: Game day appetizers, bold weeknight dinners, or impressing friends who think oven wings are boring
Crispy Baked Salt and Pepper Chicken
Ever wondered why restaurant salt and pepper wings have that specific "shatter" when you bite in, but home baked ones often feel like soggy cardboard? I once tried to replicate this using a heavy batter in the oven, and it turned into a gummy mess that tasted like steamed dough.
I realized the secret isn't adding more flour, it's actually about removing water from the skin before it ever hits the heat.
The moment those wings hit the skillet for the final toss, the smell is just electric. You get that sharp, stinging aroma of toasted garlic and the earthy warmth of five spice powder hitting hot oil. It transforms a basic roast into something that feels like it came straight from a bustling kitchen in Hong Kong.
Here is the absolute best recipe for Crispy Baked Salt and Pepper Chicken Wings. We're skipping the deep fryer but keeping all the intensity. Trust me on this, once you see the skin bubble up in the oven, you'll never go back to the traditional breading method.
The Secret to the Crunch
Since we aren't submerging these in oil, we have to trick the chicken into thinking it's being fried. It's not magic, just a few clever tweaks to how the skin reacts to heat.
- Alkaline Boost: Baking powder raises the pH level of the skin, which breaks down the proteins and allows more bubbles to form.
- Moisture Evaporation: Patting the wings bone dry prevents the oven from creating a "steam chamber" around the meat.
- Air Circulation: Using a wire rack ensures hot air hits the bottom of the wing, so you don't have to worry about the underside being mushy.
- The Flash Toss: Adding the seasoning at the very end in a hot pan prevents the spices from burning while they fuse to the crispy skin.
| Method | Time | Texture | Best For |
|---|---|---|---|
| Deep Fried | 15 mins | Heavy Crunch | Large Parties |
| Oven Baked | 42 mins | Light Shatter | Healthier Option |
| air fried | 25 mins | Very Dry Crisp | Small Batches |
Component Analysis
Understanding why these specific ingredients are here helps you tweak the recipe without ruining the texture.
| Ingredient | Science Role | Pro Secret |
|---|---|---|
| Baking Powder | Surface Texturizer | Use aluminum free to avoid a metallic aftertaste |
| Five Spice | Aroma Depth | A tiny bit goes a long way; don't overdo it |
| White Pepper | Sharp Heat | Provides that "hidden" spice common in Chinese cooking |
| Neutral Oil | Heat Transfer | Use avocado or canola for the over high heat skillet toss |
Picking Your Ingredients
I've found that using "party style" wings (separated flats and drums) works best because they cook more evenly. If you're using whole wings, you might need to add 5 minutes to the timer.
- 2 lbs chicken wings, party style
- 1 tbsp extra virgin olive oil
- 1 tsp baking powder Why this? Creates those tiny bubbles for a crispy exterior
- 1/2 tsp fine sea salt
- 1 tsp kosher salt Why this? Coarser grains stick better during the final toss
- 1 tsp coarsely ground black pepper
- 1/2 tsp white pepper Why this? Adds a floral, sharp heat different from black pepper
- 1/2 tsp five spice powder
- 3 cloves garlic, minced
- 2 stalks spring onion, sliced into 1 inch pieces
- 10g red bird's eye chilies, sliced Why this? High heat and bright flavor
- 1 tbsp neutral oil
For the salt, if you only have table salt, just reduce the amount by a third because it's much saltier by volume. If you want a different protein, this technique also works for pork belly, though you'll need a longer roast. For other high protein ideas, you might enjoy a Marinade with Soy Sauce recipe for a lighter meal.
The Essential Gear
You don't need a professional kitchen, but a couple of tools make a massive difference here. A sturdy baking sheet is obvious, but the wire rack is non negotiable. Without it, the wings sit in their own rendered fat and steam, which is the enemy of the "shatter" we're looking for.
I usually use a heavy stainless steel skillet for the final toss. Non stick is fine, but stainless holds heat better, which helps the garlic and chilies sizzle almost instantly. Also, grab some high-quality paper towels.
You'll be surprised how much moisture a wing holds, and getting them bone dry is the most important step of the whole process.
Making the Wings
Right then, let's crack on. Follow these steps closely, especially the drying part, or you'll end up with rubbery skin.
- Preheat oven to 425°F (220°C). Pat chicken wings extremely dry with paper towels until the skin feels tacky, not wet. Note: Any leftover moisture will steam the chicken
- In a large bowl, toss the dried wings with olive oil, baking powder, and fine sea salt until evenly coated.
- Arrange wings in a single layer on a wire rack placed over a baking sheet, ensuring they do not touch.
- Bake for 40 minutes, flipping the wings halfway through, until the skin is mahogany colored and hard to the touch.
- Allow wings to rest for 2 minutes. Note: This lets the juices redistribute so the skin stays crisp
- Heat 1 tbsp of neutral oil in a skillet over medium high heat. Sauté minced garlic, sliced chilies, and spring onions for 60 seconds until the garlic is fragrant and golden.
- Toss the baked wings into the skillet along with the kosher salt, black pepper, white pepper, and five spice powder.
- Stir rapidly for 1 minute until the seasoning clings to the crust and smells toasted.
Fixing Common Wing Issues
Even with a plan, things can go sideways. Usually, it's a temperature or moisture problem.
Why are they soggy?
This usually happens if the oven wasn't fully preheated or the wings were crowded. If they touch, they steam each other. Ensure there's at least an inch of space between each piece.
Why did spices burn?
The final toss happens fast. If your skillet is smoking, kill the heat before adding the wings. The residual heat is enough to toast the five spice without turning it bitter.
Skin not bubbling?
You might have used baking soda instead of baking powder, or the wings weren't dry enough. According to guidelines from Serious Eats, the pH shift from baking powder is what creates those specific micro blisters on the skin.
| Problem | Root Cause | Solution |
|---|---|---|
| Rubber skin | Too much moisture | Pat dry twice with paper towels |
| Bland taste | Under seasoned toss | Increase kosher salt in the final step |
| Burnt garlic | Heat too high | Lower flame before adding aromatics |
Mistakes Checklist:
- ✓ Did you use baking powder, NOT baking soda?
- ✓ Are the wings spaced apart on the rack?
- ✓ Did you pat them dry until they were tacky?
- ✓ Did you flip them halfway through?
- ✓ Did you toss the spices in at the very end?
Fun Flavor Variations
Once you've got the base down, you can really play around with the aromatic toss. The beauty of this recipe is that the "salt and pepper" part is basically a blank canvas.
- Szechuan Heat: Swap the bird's eye chilies for Szechuan peppercorns for that signature numbing sensation.
- Honey Salt Mix: Drizzle one tablespoon of honey into the skillet in the last 10 seconds of tossing. It creates a sticky sweet glaze that contrasts with the salt.
- Air Fryer Way: Cook at 400°F for 20-25 minutes, shaking halfway. The final skillet toss remains the same.
- Less Salt Version: Replace half the salt with smoked paprika for a depth of flavor that doesn't rely on sodium.
If you're feeling adventurous with other flavors, check out my Homemade Stromboli recipe for something completely different but just as comforting.
Adjusting the Batch Size
Scaling this recipe is pretty straightforward, but don't just multiply everything linearly, especially the spices.
Cutting the recipe in half: Use a smaller baking sheet to keep the heat concentrated. I'd recommend beating one egg just in case you want a wash, but for this recipe, just use half the oil. Reduce the bake time by about 5-8 minutes, as smaller batches often cook slightly faster.
Doubling or tripling the batch: Work in batches for the final skillet toss. If you crowd the pan with 4 lbs of wings, the temperature will drop, and you'll end up boiling the wings in oil rather than searing them. For the oven, increase the salt and five spice to only 1.5x the original amount.
Spices can become overwhelming when scaled up perfectly linearly.
| Goal | Adjustment | Result |
|---|---|---|
| More Heat | Double the chilies | Intense spice level |
| Extra Crunch | Double bake time (low temp) | Drier, harder skin |
| Leaner Version | Use spray oil | Slightly less blistered skin |
Wing Myths
There are a few things people tell you about wings that are just plain wrong. Let's clear the air.
Myth: Searing meat "seals in" the juices. Searing is for flavor, not moisture. The crust on these wings adds an incredible depth of taste, but the juiciness comes from not overcooking the meat and letting it rest.
Myth: You need flour for a "crunchy" bake. Flour can actually lead to a gummy texture in the oven if not fried. The baking powder method is superior for baking because it modifies the skin itself rather than adding a layer on top.
Storing and Reheating
These are best eaten the second they leave the pan, but we've all had leftovers. Store the wings in an airtight container in the fridge for up to 4 days.
Avoid the microwave. Microwaving will turn that shatter crisp skin into a soggy sponge in seconds. Instead, pop them back in the oven at 350°F for about 10 minutes, or use an air fryer for 5 minutes.
This re renders the fat and brings back the crunch.
For zero waste, don't toss the leftover spring onion ends or garlic skins. I keep a "scrap bag" in the freezer for vegetable stock. Also, if you have a few wings left, chop them up and toss them into a stir fry the next day - the seasoned skin adds a great flavor base to the dish.
What to Serve Alongside
Because these wings are so bold and salty, you need sides that can cut through the richness. Something acidic or creamy works best.
I love serving these with a side of smashed cucumber salad with rice vinegar and sesame oil. The coolness of the cucumber balances the heat of the chilies. If you want something more indulgent, a side of Homemade Ranch Dressing is a fantastic dip that mellows out the five spice punch.
For a full meal, serve them over a bed of steamed jasmine rice. The rice absorbs the leftover garlic oil from the skillet, making every bite count. Honestly, don't even bother with low-fat sides here - this is a flavor first dish, so lean into the boldness!
Recipe FAQs
How do you make crispy salt and pepper chicken wings?
Coat wings in olive oil, baking powder, and fine sea salt, then bake at 425°F on a wire rack for 40 minutes. Finish them by tossing in a skillet with sautéed garlic, chilies, and spring onions along with the spice blend.
What is the secret to the crispiest wings?
Patting the chicken extremely dry with paper towels. Excess surface moisture creates steam, which prevents the skin from achieving a shatter crisp texture.
What is the secret to crispy wings in the oven?
Using baking powder and a wire rack. Baking powder alters the skin's pH to encourage browning, while the rack allows hot air to circulate 360 degrees around the meat.
What's the secret to making crispy chicken wings?
Maintaining a high oven temperature of 425°F. This intense heat renders the fat quickly, resulting in a mahogany colored crust that is hard to the touch.
Can I bake the wings directly on a baking sheet without a rack?
No, this will result in soggy bottoms. Without a rack, the wings sit in their own rendered fat, which steams the underside instead of crisping it.
Is it true that reheating wings in the microwave keeps them crispy?
No, this is a common misconception. Microwaving turns the skin into a soggy sponge; instead, use an air fryer for 5 minutes or an oven at 350°F for 10 minutes.
What should I serve with these salt and pepper wings?
Pair them with a crisp cucumber salad or steamed bok choy. If you are planning a larger appetizer spread, these complement the bold flavors of Thai chicken meatballs perfectly.
Crispy Baked Salt And Pepper Chicken