Oven Baked Spaghetti Squash: Firm and Golden
- Time:5 minutes active + 40 minutes roasting = Total 50 minutes (plus 5 minutes resting)
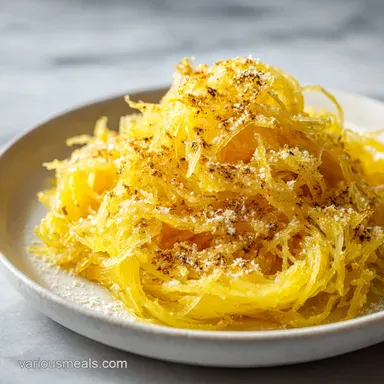
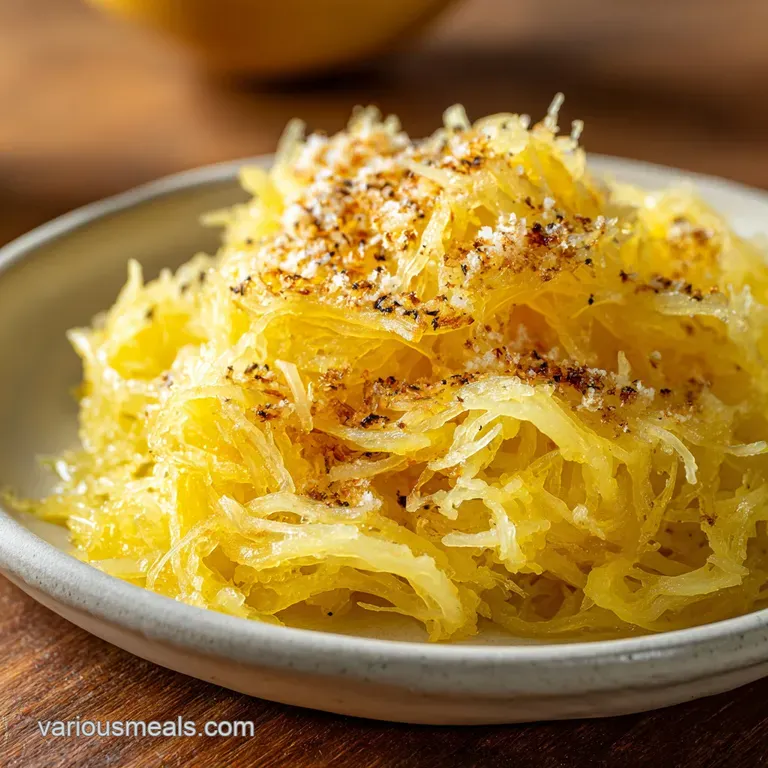
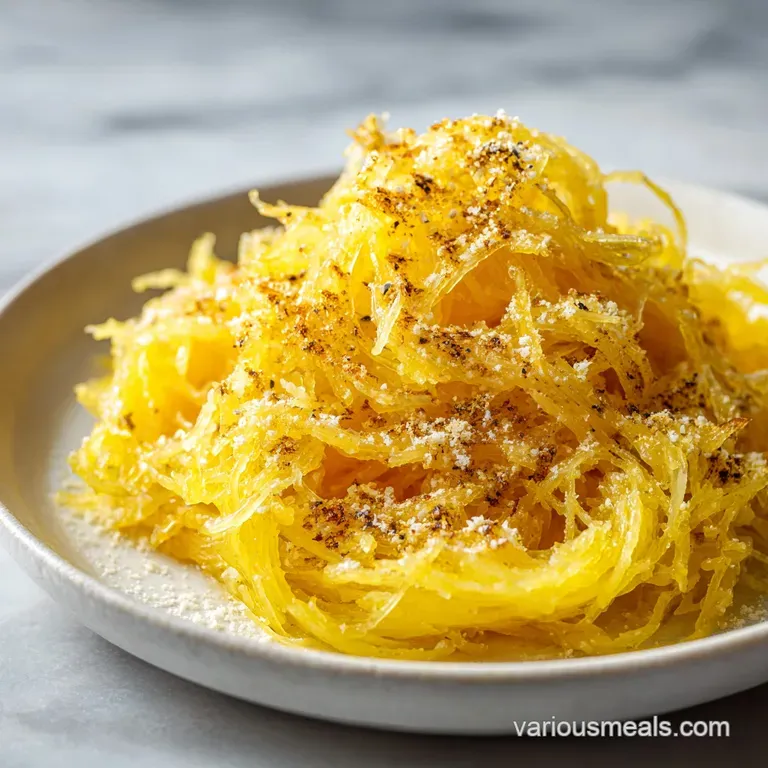
- Flavor/Texture Hook: Firm, pasta like strands topped with bubbling, golden parmesan
- Perfect for: budget-friendly meal prep, plant forward dinners, or low carb pasta alternatives
- The Secret to Oven Baked Spaghetti Squash
- Quick Recipe Specs
- Method Comparison
- The Essential Ingredient List
- Necessary Kitchen Gear
- Detailed Cooking Steps
- Fixing Common Errors
- Flavor Variation Ideas
- Scaling for More People
- Truth About Squash Myths
- Storage and Reheating
- Best Serving Pairings
- Recipe FAQs
- 📝 Recipe Card
The Secret to Oven Baked Spaghetti Squash
There is nothing more frustrating than spending forty minutes roasting a squash only to find it's a soggy, flavorless puddle. I've been there, staring at a pile of mush that looked more like oatmeal than pasta.
The culprit is usually roasting it cut side up, where the moisture evaporates too quickly or pools in the center, leaving you with a texture that just doesn't work.
The fix is actually pretty simple, but it changes everything. By flipping the squash face down, you create a natural steam chamber. The flesh cooks in its own juices and the olive oil, which keeps the "noodles" tender but distinct.
It is the difference between a vegetable that feels like a chore to eat and one that actually satisfies that pasta craving.
This recipe focuses on a plant forward approach that doesn't sacrifice flavor. We are using a high heat to get those edges slightly caramelized and a quick broil at the end to add a savory, salty crust. It's a budget friendly way to get a nutrient dense meal on the table without spending an hour over the stove.
Quick Recipe Specs
When you are planning your week, it helps to know exactly how this fits into your flow. This isn't a "set it and forget it" meal, but it's very low effort. Most of the time is spent waiting for the oven to do the heavy lifting.
Since we are focusing on a plan based execution, think of this in three distinct phases. First, the prep flow takes about 5 minutes to get the squash ready. Second, the cooking flow is a solid 40 minutes of roasting.
Finally, the finish flow is where we scrape the strands and hit it with the broiler for that golden finish.
If you are doing this for meal prep, I recommend roasting two or three squashes at once. They hold up incredibly well in the fridge, and you can just scoop out what you need for different meals throughout the week. It's a great way to keep your lunches healthy and affordable.
Method Comparison
Before we get into the ingredients, you might be wondering if there is a faster way. I've tried them all, and here is the honest truth about the results.
| Method | Time | Texture | Best For |
|---|---|---|---|
| Oven Baked | 50 min | Firm & Roasted | Quality meals |
| Microwave | 15 min | Soft & Steamed | Extreme rush |
| Stovetop | 30 min | Uneven | Small portions |
The oven is the only way to get that specific roasted flavor. The microwave is fine if you're in a pinch, but you lose all the depth of flavor that comes from the oven's dry heat.
The Essential Ingredient List
For this, you don't need a pantry full of fancy items. We are relying on basic, healthy fats and a hit of salty cheese to bring out the natural sweetness of the squash.
- 1 large spaghetti squash (approx 3 lbs / 1.36kg) Why this? Medium large size ensures a good balance of flesh to skin.
- 2 tbsp olive oil Why this? High smoke point and adds a silky mouthfeel.
- ½ tsp kosher salt (such as Diamond Crystal) Why this? Draws out moisture to prevent sogginess.
- ¼ tsp cracked black pepper Why this? Adds a sharp contrast to the sweet squash.
- ¼ cup grated parmesan cheese Why this? Provides a salty, umami crust during the broil.
- 1 tbsp unsalted butter, melted Why this? Adds a rich, velvety finish to the strands.
Ingredient Substitutions
If you are missing something or have dietary restrictions, these swaps work without ruining the dish.
| Original Ingredient | Substitute | Why It Works |
|---|---|---|
| Olive Oil | Avocado Oil | Similar smoke point. Note: More neutral flavor |
| Parmesan Cheese | Nutritional Yeast | Great for vegan versions. Note: Nutty but less salty |
| Unsalted Butter | Melted Coconut Oil | Plant based fat. Note: Adds a very subtle coconut hint |
Selecting the right squash is actually half the battle. Look for one that feels heavy for its size and has a skin that is matte, not shiny. If it feels light, it might be dried out inside, which means your strands won't be as succulent.
Necessary Kitchen Gear
You don't need professional grade equipment for this, but a few specific tools make it much safer and easier. Cutting into a raw spaghetti squash can feel like trying to chop a bowling ball, so don't wing it.
A heavy chef's knife is mandatory. If you have a serrated knife, that actually works wonders for the initial cut because the teeth grip the tough skin. You'll also want a sturdy baking sheet. I prefer a rimmed one so any oil or juices don't leak into the bottom of my oven.
Finally,, a large metal spoon is your best friend for the seeding process. Plastic spoons tend to snap when you're trying to scrape out those stubborn seeds. A fork is essential for the final step to get those perfect, long strands.
Detailed Cooking Steps
Follow these steps exactly to ensure you get that firm, pasta like texture. The timing is key here, so keep an eye on the clock.
Phase 1: Prep and Halving
- Preheat the oven to 400°F (200°C). Note: A fully preheated oven prevents the squash from steaming too much at the start.
- Carefully cut the spaghetti squash in half lengthwise.
- Use a large spoon to scoop out the seeds and stringy pulp, leaving a clean 'bowl' of squash.
Phase 2: The Roasting Process
- Brush the interior flesh generously with olive oil and sprinkle evenly with salt and cracked black pepper.
- Place the spaghetti squash halves cut side down on a baking sheet. Note: This traps the steam and prevents the flesh from drying out.
- Roast in the center rack of the oven for 35–45 minutes until the skin is easily pierced with a knife and the flesh feels soft.
Phase 3: The Finishing Touch
- Remove from the oven and let the squash rest for 5 minutes. Note: This allows the juices to redistribute so they don't run out when you scrape.
- Turn the halves over and use a fork to gently scrape the flesh from the edges toward the center to create pasta like strands.
- Optional: Drizzle with melted butter, sprinkle with parmesan cheese, and broil for 2–3 minutes until the cheese is bubbling and golden.
Fixing Common Errors
Even with a simple recipe, things can go sideways. Usually, it comes down to the temperature of the oven or the variety of the squash.
Why Your Strands Are Mushy
If your squash feels like a puree instead of noodles, you likely overcooked it or used a squash that was too watery. When the cell walls break down too much, the structure collapses. Try reducing the roast time by 5 minutes next time.
Why the Squash Stays Hard
If the skin is still tough after 40 minutes, your oven might be running cold. Check your temp with an internal thermometer. You can also try adding a tiny splash of water to the baking sheet to create more steam.
| Problem | Root Cause | Solution |
|---|---|---|
| Watery Puddle | Roasted cut side up | Roast cut side down |
| Burnt Edges | Oven rack too high | Move to center rack |
| No "Strands" | Overcooked | Reduce roast time by 5 mins |
Common Mistakes Checklist
- ✓ Pat the outside of the squash dry before cutting to prevent slipping
- ✓ Ensure the oven is fully preheated to 200°C before the squash goes in
- ✓ Don't over scrape the skin, or you'll get bitter bits in your meal
- ✓ Let the squash rest for at least 5 minutes before scraping
- ✓ Use a fork, not a spoon, to create the pasta strands
Flavor Variation Ideas
Once you have the base down, you can take this in a dozen different directions. Since this is a nutrient dense base, it pairs well with almost anything.
For a more hearty meal, I love adding a splash of pesto or a dollop of ricotta. If you are looking for something even lower in carbs, you can use this as a base for a Lasagna with Cottage Cheese recipe style topping, layering it with marinara and mozzarella.
If you want something zesty, try a "Mexican Style" version by adding lime juice, cilantro, and a sprinkle of cotija cheese instead of parmesan. It turns the squash into something that feels more like a taco filling than a pasta dish.
Scaling for More People
When you're cooking for a crowd, you can't just multiply everything linearly, or you might end up with a soggy mess on the pan.
Scaling Down (1-2 people): Use a small squash (around 1.5 lbs). Reduce the roasting time by about 10-15 minutes since there is less mass to heat through. Use a smaller baking sheet to keep the heat concentrated.
Scaling Up (6-8 people): Roast 3-4 squashes. Do not crowd the pan, or the squash will steam instead of roast. Work in batches if necessary. Increase salt and pepper to 1.5x, but keep the oil per squash the same to avoid greasiness.
Truth About Squash Myths
There are a few things people always say about spaghetti squash that just aren't true. Let's set the record straight.
The biggest myth is that cutting the squash into cubes is "faster." While the cubes cook quicker, you lose the "spaghetti" effect. You get roasted chunks of squash, which are great, but they aren't the pasta like strands this recipe is known for.
Another common misconception is that you need to peel the squash before roasting. This is a huge mistake. The skin acts as a protective bowl that holds the flesh together and prevents it from drying out in the high heat of the oven.
Storage and Reheating
If you're meal prepping, this is where the real value is. Roasted spaghetti squash stays fresh in the fridge for 3 to 5 days if stored in an airtight container. I usually keep the strands in the shell if I'm eating them the next day, or scoop them into a glass container for easier portioning.
For freezing, you can freeze the scraped strands for up to 3 months. Just be aware that the texture changes slightly and becomes a bit softer. Thaw them in the fridge overnight before using.
To reheat, avoid the microwave if you can. The microwave tends to make the squash watery. Instead, toss the strands in a skillet with a teaspoon of olive oil over medium heat for 3-5 minutes. This brings back that roasted flavor and firms up the strands.
Zero waste tip: Don't throw away those seeds! Scoop them out, rinse them, pat them dry, and toss them with a bit of salt and paprika. Roast them at 325°F (160°C) for 15 minutes for a healthy, crunchy snack.
Best Serving Pairings
This dish is quite mild, so it needs some bold flavors to balance it out. I usually go for something with a bit of acidity or a rich protein.
A simple garlic lemon shrimp or a grilled piece of salmon works beautifully. For a plant forward breakfast or brunch, this squash pairs surprisingly well with a Spinach Ricotta Brunch Bake, giving you a mix of savory cheese and nutrient dense veg.
If you want a side, a crisp arugula salad with a balsamic vinaigrette cuts through the richness of the butter and parmesan perfectly. The peppery greens balance the natural sweetness of the oven baked spaghetti squash, making the whole meal feel cohesive and fresh.
Recipe FAQs
At what temperature do you bake spaghetti squash?
Bake at 400°F (200°C). This high heat is essential for roasting the flesh and developing a deep, savory flavor.
Is spaghetti squash ok for gastritis?
Yes, it generally is. The soft texture and low acidity of cooked squash make it easy on the digestive system.
How long does spaghetti squash take to cook in the oven at 350 degrees?
Roast at 400°F for 35 45 minutes instead. Cooking at 350°F takes much longer and results in a steamed texture rather than a roasted one.
How long do you keep squash in the oven at 400 degrees?
Keep it in for 35 45 minutes. Roast until the skin is easily pierced with a knife and the flesh feels soft to the touch.
How to scrape the squash into strands?
Use a fork to gently scrape the flesh. Work from the outer edges toward the center after letting the squash rest for 5 minutes.
Is it true that microwaving gives the same flavor as roasting?
No, this is a common misconception. Microwaving steams the vegetable, whereas the oven's dry heat creates the specific roasted depth of flavor.
How long does roasted spaghetti squash last in the fridge?
Store for 3 to 5 days. Keep it in an airtight container, which makes it a great side to pair with honey garlic chicken wings.
Oven Baked Spaghetti Squash