Peanut Butter Protein Bars: Coconut and Chocolate
- Time:15 minutes active + 1 hour chilling = Total 1 hour 15 mins
- Flavor/Texture Hook: Velvety chocolate snap with a chewy, nutty center
- Perfect for: Post workout fuel, budget-friendly meal prep, or a nutrient dense snack
Peanut Butter Protein Bars
The scent of toasted coconut and warm peanut butter is something that always takes me back to old school energy snacks. Long before the aisles were filled with processed wraps and synthetic syrups, people relied on dense, nut based pastes for long journeys.
These coconut chocolate peanut butter protein bars are basically a modern, plant forward take on that tradition of portable, high energy fuel.
I love this recipe because it doesn't require an oven, which is a lifesaver in the summer. You get a snack that feels rich but is actually focused on nutrient dense ingredients. It's a great way to keep your energy levels steady without the sugar crash that comes from store-bought versions.
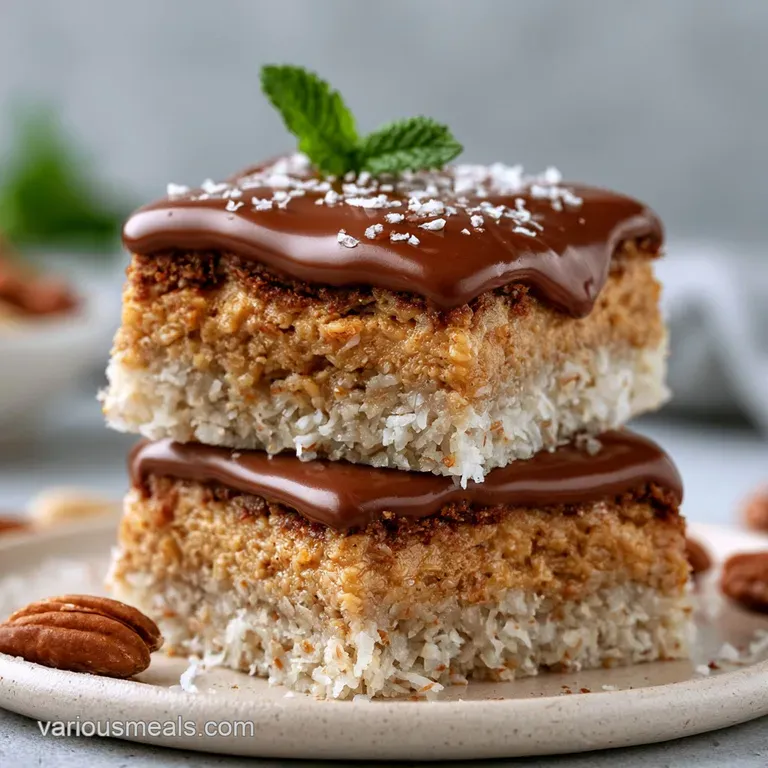
Expect a texture that is somewhere between a fudge and a traditional granola bar. The bottom is dense and chewy, while the top has a clean, velvety chocolate finish. Whether you're packing these for a hike or just need something to stop the 3 PM hunger pangs, they've got you covered.
Why Most Bars Fail
Most homemade attempts at these snacks end up as either a crumbly mess or a sticky paste that clings to the roof of your mouth. The issue usually comes down to the protein powder. Many people treat it like flour, but protein powder is a desiccant - it sucks moisture out of everything.
If you don't balance that dryness with enough fat and liquid, the bars won't hold together.
Another common pitfall is the chocolate topping. If you just melt chocolate chips alone, they often turn out brittle and shatter into a million pieces when you try to cut them. The secret is adding a bit of coconut oil.
This lowers the melting point and gives the chocolate a smoother, more flexible texture that bends rather than breaks.
Then there's the "press" problem. If you don't compact the base firmly enough, the bars will fall apart the moment you take a bite. You need to use a flat bottomed glass or a heavy spatula to really jam that mixture into the corners of the pan.
The Binding Secret
Fat Sugar Bridge: The maple syrup and peanut butter create a viscous bond that traps the protein powder and coconut. This prevents the bars from becoming grainy or separating over time.
Coconut Integration: Shredded coconut adds structural fiber. It acts like a tiny internal skeleton for the bar, giving it a chewy "bite" instead of a mushy feel.
| Method | Prep Time | Texture | Best For |
|---|---|---|---|
| No Bake | 15 minutes | Fudgy & Chewy | Meal prep, quick snacks |
| Baked | 45 minutes | Cakey & Firm | Breakfast bars, toaster friendly |
Component Analysis
| Ingredient | Science Role | Pro Secret |
|---|---|---|
| Peanut Butter | Structural Fat | Use "drippy" natural PB for easier mixing |
| Maple Syrup | Humectant | Room temperature syrup blends faster |
| Protein Powder | Protein Bulk | Vanilla flavor masks the "chalky" protein taste |
| Coconut Oil | Emulsifier | Ensures the chocolate layer doesn't crack |
Shopping List Breakdown
When picking your ingredients, remember that the quality of the peanut butter changes everything. According to USDA data, peanut butter is a powerhouse of monounsaturated fats, but some brands add palm oil which can make these bars feel greasy. I prefer a natural, creamy version for a cleaner taste.
For the Protein Base
- 1 cup (255g) creamy peanut butter Why this? Provides the main structure and healthy fats
- 1/3 cup (80ml) maple syrup Why this? Natural sweetener that keeps bars chewy
- 1 cup (120g) unsweetened shredded coconut Why this? Adds texture and fiber
- 1/2 cup (60g) vanilla protein powder Why this? Boosts protein without changing flavor
- 1 tsp (5ml) vanilla extract Why this? Deepens the sweetness
- 1/4 tsp (1.5g) fine sea salt Why this? Balances the richness of the PB
For the Chocolate Topping
- 1/2 cup (90g) semi sweet chocolate chips Why this? Classic flavor that pairs with peanut butter
- 2 tbsp (30ml) coconut oil Why this? Prevents the chocolate from shattering
| Original Ingredient | Substitute | Why It Works |
|---|---|---|
| Maple Syrup | Honey | Similar viscosity. Note: Adds a floral note and is slightly sweeter |
| Peanut Butter | Almond Butter | Similar fat content. Note: Lighter flavor, less "sticky" |
| Protein Powder | Collagen Peptides | High protein. Note: Less bulk, results in a softer bar |
| Coconut Oil | Unsalted Butter | Similar fat role. Note: Makes the topping creamier, not vegan |
These butter protein bars are designed to be budget friendly. If you're looking for other ways to use peanut based flavors in your meal prep, you might enjoy my Skinny Thai Chicken Meatballs which use a similar flavor profile in a savory way.
Kitchen Gear Needed
You don't need a fancy setup for this. A glass microwave safe bowl is essential because you'll be heating the peanut butter and chocolate. If you don't have one, a stainless steel pot over low heat works just as well.
For the pan, an 8x8 inch square is the standard. I always recommend using parchment paper. To make removal a breeze, how to create an overhang is a great trick - it gives you "handles" to lift the entire block of bars out of the pan without damaging the edges.
Finally, a flat bottomed glass or a sturdy spatula is needed for the pressing phase. If you just use a spoon, you'll end up with air pockets that make the bars crumble.
Bringing It Together

Let's crack on with the process. The key here is patience during the melting phases - don't overheat your chocolate or it will seize and become clumpy.
Base Preparation Phase
- Combine the peanut butter and maple syrup in a glass bowl.
- Microwave in 30 second intervals, stirring in between, until the mixture is fluid and glossy. Note: Overheating can make the PB oily.
- Stir in the vanilla extract and salt.
Foundation Setting Phase
- Gradually fold in the protein powder and shredded coconut.
- Stir until a thick, cohesive dough forms and no dry powder remains.
- Line an 8x8 inch baking pan with parchment paper, leaving an overhang on the sides.
- Transfer the peanut butter mixture into the pan and press firmly with a spatula or flat bottomed glass until level and compacted.
Velvety Topping Phase
- In a separate bowl, combine chocolate chips and coconut oil.
- Microwave for 30 seconds, stir, and repeat until the chocolate is smooth and velvety.
- Pour the chocolate over the base, spreading it evenly to the edges.
- Place the pan in the refrigerator for at least 1 hour until the top is firm to the touch.
Chef's Note: If you want a little extra flair, sprinkle a pinch of flaky sea salt on top of the wet chocolate before chilling. It makes the chocolate flavor pop.
Fixing Common Issues
When making chocolate peanut butter protein bars, the most common struggle is the consistency. If the mixture feels too wet to press, you might have used a very runny peanut butter. In that case, add one extra tablespoon of protein powder to stiffen it up.
If your chocolate layer is cracking, it's usually because it was chilled too quickly in a freezer rather than a fridge, or you skipped the coconut oil. The oil keeps the fats in the chocolate flexible.
Crumbly Texture Issues
This usually happens if the protein powder to syrup ratio is off. If you use a very absorbent plant based protein, you may need a tiny bit more liquid to get that hold.
Chocolate Layer Cracks
Overheating the chocolate can destroy the cocoa butter structure. Always use short bursts in the microwave and stir frequently to distribute the heat.
Grainy Protein Texture
Some protein powders don't blend well. Ensure you're stirring the base thoroughly, or consider sifting the powder first to remove any clumps.
| Problem | Root Cause | Solution |
|---|---|---|
| Base is too sticky | Too much syrup or runny PB | Add 1 tbsp protein powder |
| Bars are too dry | Too much protein powder | Stir in 1 tsp maple syrup |
| Chocolate is clumpy | Overheated in microwave | Stir in 1 tsp warm coconut oil |
Common Mistakes Checklist:
- ✓ Did you press the base firmly? (Prevents crumbling)
- ✓ Did you use coconut oil in the chocolate? (Prevents cracking)
- ✓ Did you stir the PB in intervals? (Prevents oil separation)
- ✓ Did you chill for a full hour? (Ensures a clean cut)
Swaps and Tweaks
If you're looking to change the flavor profile, these butter protein bars are very flexible. For a "darker" version, use 70% cocoa chocolate chips. This reduces the sugar content and gives it a more sophisticated taste.
For those who want a crunchier texture, try toasting the shredded coconut in a dry pan for 2-3 minutes before adding it to the mix. This brings out a nuttier aroma and adds a slight crispness to the chew. If you're a fan of decadent treats, you can follow the same chocolate melting logic as my Chocolate Covered Strawberries to create different toppings.
Nut Free Options
Swap the peanut butter for sunflower seed butter (SunButter). The flavor is slightly more earthy, but the consistency is almost identical, making it a great allergy friendly alternative.
Alternative Sweetener Options
You can use honey or agave nectar. Honey is a bit thicker and sweeter, while agave is more neutral. Just be aware that honey can make the bars slightly softer.
Vegan Adaptation Tips
These are almost vegan by default. Just ensure your chocolate chips are dairy-free and your protein powder is plant based (pea or soy protein works best here).
Adjusting Batch Size
If you're making a smaller batch (half), use a loaf pan instead of a square pan to keep the thickness the same. If you use a larger pan, the bars will be too thin and won't have that satisfying chew.
For a double batch, don't just double the salt - increase it to 1.5x first, then taste. Too much salt can overpower the maple syrup. Work in batches when melting the chocolate to avoid burning the bottom of the bowl.
Decision Shortcut
- Want it fudgier? Increase peanut butter by 2 tbsp.
- Want it crunchier? Toast the coconut first.
- Want it sweeter? Use honey instead of maple syrup.
Protein Bar Myths
Many people think that adding more protein powder automatically makes the bar "healthier." In reality, too much powder ruins the texture and makes the bar taste like chalk. Balance is key for a snack you'll actually want to eat.
Another myth is that these must be kept in the freezer to stay firm. While the freezer is great for long term storage, these are stable in the fridge for a week. They only become "too soft" if left in a hot car or direct sunlight.
Fridge and Freezer Tips
Store these in an airtight container. In the fridge, they'll stay fresh for about 7 to 10 days. If you're planning to keep them longer, the freezer is your best friend. They last up to 3 months in the freezer without losing their flavor.
For zero waste, if you have leftover chocolate in the bowl, don't wash it out. Scrape it onto a piece of parchment paper and freeze it into "chocolate shards" for a quick treat. If you have extra shredded coconut, toast it and keep it in a jar to sprinkle over oatmeal or yogurt.
To reheat, don't use a microwave - it will melt the chocolate and turn the base into a puddle. Just let them sit at room temperature for 10 minutes before eating for the best texture.
Best Ways to Enjoy
The best way to eat these is straight from the fridge for that maximum "snap" of the chocolate. However, if you prefer a softer, more fudge like experience, let them sit out for a bit.
These are great for meal prep. I usually slice them into 12 equal bars and wrap each one in parchment paper. This stops them from sticking together in your gym bag or lunchbox. Pair them with a handful of fresh berries or a glass of cold almond milk for a complete, nutrient dense snack.
Whether you're using them as a pre workout boost or a healthy dessert, these Peanut Butter Protein Bars hit the spot every time. They prove that you don't need an oven or a long list of ingredients to make something that feels high end and tastes satisfying.
Recipe FAQs
How long do these bars stay fresh?
Store them in the refrigerator for up to two weeks. Keeping them chilled prevents the peanut butter base from softening at room temperature.
Can I use honey instead of maple syrup?
Yes, honey is a great alternative. It is thicker and sweeter than maple syrup, which may make the bars slightly softer. If you enjoyed balancing these sweet and salty flavors, see how we use a similar profile in our soy sauce marinade.
How to melt the chocolate topping without burning it?
Microwave in 30-second intervals. Stir between each heating cycle until the chocolate and coconut oil are smooth and glossy.
Why is my protein bar mixture too crumbly to press into the pan?
Add a small amount of additional maple syrup. Stir it in gradually until the dough becomes cohesive and holds together.
Is it true that I must use creamy peanut butter for the bars to set?
No, this is a common misconception. Crunchy peanut butter works just as well, though it adds a different texture to the final bars.
How to remove the bars from the pan without them breaking?
Lift the block using the parchment paper overhang. This allows you to transfer the entire slab to a cutting board before slicing into 12 bars.
Can I skip the one-hour refrigeration time?
No, the chilling period is essential. Refrigerating ensures the chocolate top and peanut butter base are firm enough to slice into clean squares.
Peanut Butter Protein Bars

