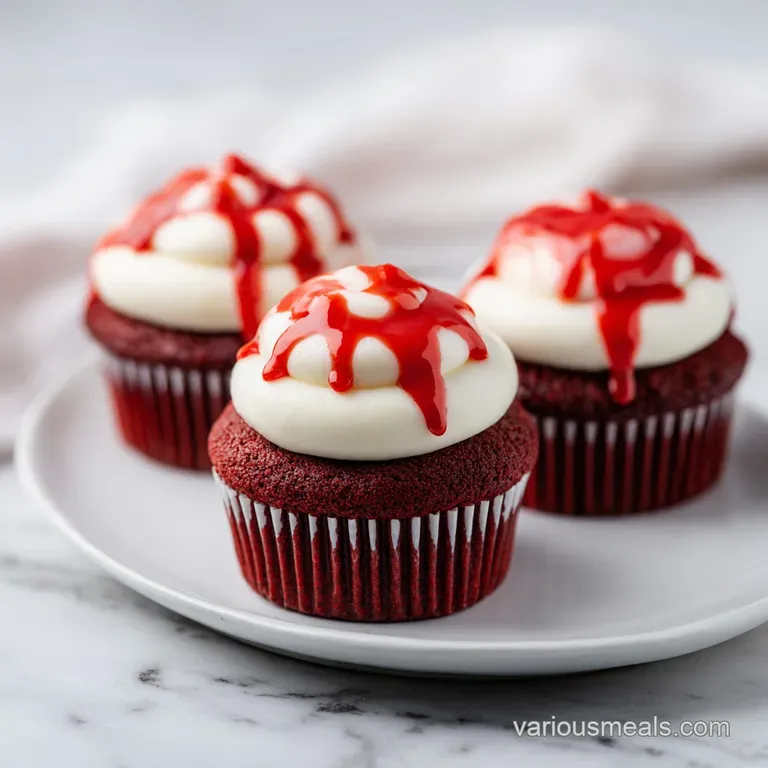
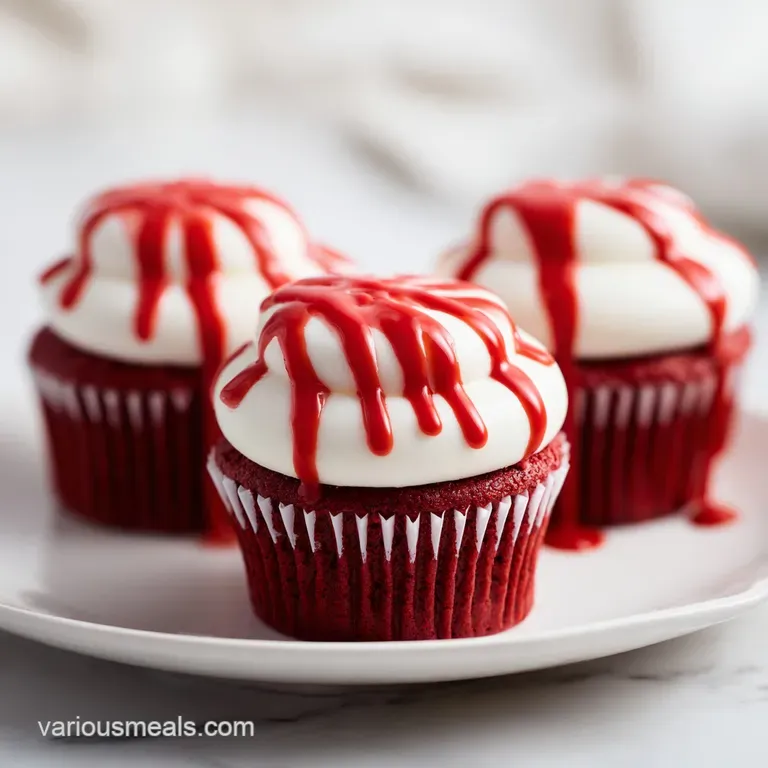
Spooky Halloween Red Velvet Cupcakes
- Time:15 minutes active + 20 minutes baking = Total 35 minutes
- Flavor/Texture Hook: Velvety crumb with a tangy, cream cheese finish
- Perfect for: Spooky parties, kid friendly baking, or a moody autumn dessert
- Easy Halloween Red Velvet Cupcakes From Scratch
- The Secret to Velvet Texture
- Gathering Your Baking Essentials
- Necessary Equipment for Baking
- Detailed Step-by-Step Instructions
- Common Baking Glitches and Fixes
- Troubleshooting Common Issues
- Ways to Customize Your Treats
- Freshness and Zero Waste Tips
- Spooky Presentation and Decor
- Recipe FAQs
- 📝 Recipe Card
That sharp, sweet smell of cocoa mixed with vanilla always hits me first. I remember the first time I tried making these for a neighborhood bash, and I went way too heavy on the food coloring.
My kitchen looked like a crime scene, and my fingertips were stained bright red for three days, but the look on everyone's faces when they saw those deep red cakes topped with "bloody" raspberries was worth it.
There's just something about the contrast in this dish that works so well. You've got the richness of the cocoa, the tang of the buttermilk, and that velvety frosting that just melts. These halloween red velvet cupcakes aren't just about the look, though.
They're about that specific, moist texture that feels a bit more special than your standard chocolate cake.
Right then, let's get into the nitty gritty. We're going to make sure these come out fluffy, vibrant, and just the right amount of creepy. I'll show you exactly how to avoid the common pitfalls, like the dreaded "sunken center" or frosting that slides right off the cake.
Trust me on this, a few small tweaks make a massive difference.
Easy Halloween Red Velvet Cupcakes From Scratch
The magic of this recipe is in the balance. Red velvet isn't just chocolate cake with dye, it's a specific interaction between cocoa, acid, and leavening. When you're making halloween red velvet cupcakes, you want a color that's intense and a texture that's almost silky.
I've found that using a bit of vinegar alongside the buttermilk is the real secret. It gives the cake a slight lift and ensures the red color stays vibrant after it hits the oven. If you've ever had velvet cakes that turned a weird brownish orange, it's usually because the pH level was off.
We're going to avoid that entirely here.
But let's be honest, the best part is the decorating. Adding those white chocolate "eyeballs" and the raspberry "blood" turns a simple dessert into a centerpiece. It's an approachable way to get that "wow" factor without needing a professional pastry degree.
The Secret to Velvet Texture
If you're wondering why this recipe feels different from a regular cake, it's all about the chemistry. I'm not talking about a lab, but just how the ingredients play together in your bowl.
- Acid Activation: The vinegar and buttermilk react with the baking soda to create tiny bubbles, which is what makes the crumb so airy. According to the experts at King Arthur Baking, this acidic environment also helps keep the cake moist.
- Cocoa Control: We use just a touch of cocoa powder. This provides a subtle chocolate note without overpowering the red color or the tang of the frosting.
- Oil Based Moisture: Using vegetable oil instead of butter in the cake base ensures the cupcakes stay soft even if you keep them in the fridge for a few days.
- Sugar Structure: The granulated sugar doesn't just sweeten, it helps tenderize the flour, giving us that "velvet" feel.
Since some of you might be in a rush or looking for a different vibe, I've put together a quick comparison. Some people prefer the "hack" version, while others want the full experience.
| Feature | Fast Method (Mix) | Classic Method (Scratch) | Impact on Result |
|---|---|---|---|
| Time | 10 mins prep | 15 mins prep | Minimal time difference |
| Flavor | Generic sweet | Complex, tangy | Scratch is much richer |
| Texture | Spongy | Velvety/Dense | Scratch feels more "premium" |
| Control | Fixed ingredients | Fully adjustable | Scratch allows for less sugar |
This contrast is why I always push for the scratch method. The effort is barely higher, but the result is a totally different experience on the tongue.
Gathering Your Baking Essentials
Let's look at what's actually doing the work in this recipe. I like to think of ingredients as tools, each with a specific job to do.
| Ingredient | Science Role | Pro Secret |
|---|---|---|
| Buttermilk | Tenderizes gluten | Use full fat for a richer mouthfeel |
| Baking Soda | Primary lift | Sift it with flour to avoid "soda clumps" |
| Vinegar | Color stabilizer | Distilled white is best for a clean taste |
| Cream Cheese | Structural fat | Cold cheese = runny frosting; use softened |
Now, let's get into the full list. I've included some swaps because I know not everyone has a carton of buttermilk sitting in the fridge.
For the Cake:
- 1.5 cups all purpose flour Why this? Standard protein level for a balanced crumb (Substitute: Cake flour for an even softer texture)
- 1 cup granulated sugar Why this? Provides sweetness and moisture (Substitute: Cane sugar)
- 1 tsp baking soda Why this? Reacts with acid for lift (No substitute)
- 1 tsp salt Why this? Balances the sugar (Substitute: Kosher salt)
- 1 tbsp unsweetened cocoa powder Why this? Adds the "velvet" depth (Substitute: Dutch processed for darker color)
- 1 cup buttermilk Why this? Adds tang and tenderness (Substitute: 1 cup milk + 1 tbsp lemon juice)
- 2 large eggs Why this? Binds the batter (Substitute: 2 flax eggs for vegan)
- 1.5 cups vegetable oil Why this? Ensures a moist crumb (Substitute: Canola oil)
- 1 tsp white distilled vinegar Why this? Activates soda and pops the red (Substitute: Apple cider vinegar)
- 1 tsp vanilla extract Why this? Classic aroma (Substitute: Almond extract for a twist)
- 2 tbsp red food coloring Why this? The iconic spooky look (Substitute: Beet powder, though color is muted)
For the Spooky Frosting:
- 8 oz full fat cream cheese Why this? Tangy base (Substitute: Neufchâtel for a lighter version)
- 0.5 cup unsalted butter Why this? Stabilizes the peak (Substitute: Vegan butter)
- 4 cups powdered sugar Why this? Creates the structure (Substitute: Non fat dry milk powder mix)
- 1 tsp vanilla extract Why this? Rounds out the sweetness (Substitute: Maple extract)
- 1 tbsp heavy cream Why this? Adjusts consistency (Substitute: Whole milk)
For the Decorations:
- Fresh raspberries (for blood drips)
- White chocolate chips (for eyeballs)
- Black sanding sugar (for dirt effects)
But what about the frosting? I've had too many people tell me their cream cheese frosting turned into a puddle. To avoid that, check out these tips from Serious Eats on stabilizing fat based frostings.
Necessary Equipment for Baking
You don't need a fancy kitchen to make these halloween red velvet cupcakes, but a few things make life easier. If you have a stand mixer such as KitchenAid, use it for the frosting, but for the batter, a hand whisk is actually better.
First, you'll need a standard 12 cup muffin tin. Make sure you have paper liners, as red velvet batter is notorious for sticking to the pan if you go liner less. You'll also need a medium bowl for dry ingredients and a larger one for the wet stuff.
For the frosting, a hand mixer or stand mixer is non negotiable. Trying to beat 4 cups of powdered sugar by hand is a workout nobody wants. Finally, grab a piping bag with a large open star tip. This is how you get those tall, velvety swirls that look like they came from a bakery.
Detailed step-by-step Instructions
Right then, let's crack on. Follow these steps closely, and pay attention to the sensory cues. That's how you know you're on the right track.
Prepping the Oven and Pan
- Preheat your oven to 350°F (175°C). Note: Let it fully preheat so the cupcakes get an immediate lift.
- Line your muffin tin with 12 paper liners.
- Lightly grease the tops of the liners with a tiny bit of butter. This sounds weird, but it helps the cake rise straight up without sticking to the sides of the paper.
Mixing the Batter
- In a medium bowl, whisk together the flour, sugar, baking soda, salt, and cocoa powder. Make sure there are no large lumps of cocoa.
- In a separate large bowl, beat the vegetable oil, buttermilk, eggs, vinegar, vanilla, and red food coloring. Mix until the color is uniform and vibrant.
- Gradually pour the dry ingredients into the wet mixture. Stir with a whisk or spatula until smooth. Note: Stop mixing the moment the flour disappears to avoid a tough cake.
Baking to Perfection
- Divide the batter evenly among the 12 liners. Fill them about 2/3 full.
- Bake for 20 minutes until a toothpick inserted in the center comes out clean and the tops spring back when lightly touched.
- Let them cool completely in the pan for 10 minutes, then move them to a wire rack.
Whipping the Frosting
- Beat the softened cream cheese and butter together on medium speed. Continue until the mixture is velvety and pale.
- Gradually add the powdered sugar and vanilla extract.
- Stir in the heavy cream one teaspoon at a time until the frosting holds a stiff peak.
Creating the Spooky Designs
- Pipe a high swirl of frosting onto each cooled cupcake.
- Press a fresh raspberry into the center or side, letting a bit of the juice run down the side for a "blood" effect.
- Place a white chocolate chip on top of the frosting, then add a tiny dot of red dye or jam to create an eyeball.
- Sprinkle black sanding sugar around the base for a "graveyard dirt" look.
Common Baking Glitches and Fixes
Even for experienced bakers, these halloween red velvet cupcakes can be tricky. The most common issues usually stem from temperature or over mixing.
Troubleshooting Common Issues
| Issue | Solution |
|---|---|
| Why Your Cupcakes Sunk In | If your cakes rose beautifully and then collapsed into a crater, you likely over beat the batter. When you mix too much, you incorporate too much air, which expands in the oven and then pops, causing |
| Why Your Frosting is Runny | Runny frosting is usually the result of cream cheese that was too warm or too much heavy cream. The fat in the cheese breaks down when overheated, losing its ability to hold the sugar. |
| Why the Color is Dull | If your cupcakes look brown instead of red, your baking soda might be old, or you didn't use enough vinegar. The acidity is what keeps the red dye from shifting toward a brown hue. |
Quick Fix Checklist:
- ✓ Use room temperature eggs to ensure a smooth emulsion.
- ✓ Sift the cocoa powder to prevent bitter brown streaks.
- ✓ Cool cakes completely before frosting to prevent melting.
- ✓ Use full fat cream cheese for the most stable peaks.
- ✓ Measure flour by spooning it into the cup, not scooping.
Ways to Customize Your Treats
Once you've mastered the base halloween red velvet cupcakes, you can really start playing with the theme. I love making a "bloody core" by scooping out a small circle of cake and filling it with raspberry jam before frosting.
If you want to lean into the "scary" side, try mixing some black cocoa powder into half the batter. You can swirl the red and black batters together for a marbled, gothic effect. It looks incredible when you bite into it.
For a party platter, these pair brilliantly with something a bit more fresh. If you're serving these as part of a larger spread, try adding some Chocolate Covered Strawberries to the table. The bright red of the berries complements the velvet cakes perfectly.
Decision Shortcut:
- If you want a "Gothic" vibe → Use black cocoa for marbling.
- If you want "Gory" details → Increase the raspberry jam filling.
- If you want a "Classic" look → Stick to the white swirls and sanding sugar.
Freshness and Zero Waste Tips
Red velvet cake is surprisingly hardy, but the cream cheese frosting is the sensitive part. Because of the dairy, these halloween red velvet cupcakes need to be stored properly.
Storage Guidelines:
- Fridge: Keep them in an airtight container for up to 5 days. The cake actually stays moister in the fridge thanks to the oil base.
- Freezer: You can freeze the unfrosted cupcakes for up to 3 months. Just wrap them tightly in plastic wrap and foil. Thaw at room temperature for 2 hours before frosting.
- Reheating: If you like them slightly warm, pop one in the microwave for 5-8 seconds (without frosting!).
Regarding zero waste, don't throw away the leftover frosting. It's essentially a fancy cream cheese dip. You can use it to dip apple slices or pretzels for a quick snack. If you have a few raspberries left over that are too mushy for decorating, simmer them with a splash of water and a pinch of sugar to make a quick coulis.
Interestingly, if you're hosting a brunch style Halloween party, these cakes make a great dessert pairing with something savory. I've seen people serve them alongside Air Fryer Eggs for a weirdly satisfying sweet and savory morning spread.
Spooky Presentation and Decor
The difference between a regular cupcake and a "scary" cupcake is all in the details. When decorating these halloween red velvet cupcakes, think about textures. You want the smoothness of the frosting to contrast with the "grit" of the sanding sugar.
For the eyeball effect, don't just plop the white chocolate chip on. Use a toothpick to put a tiny dot of dark chocolate or red gel in the center. It gives the eye a "pupil," which makes it look much more lifelike and creepy.
If you want a "shatter" effect on the frosting, you can sprinkle a bit of crushed peppermint or clear sugar crystals. When the guests bite into the cake, those crystals will shatter, adding a nice tactile element to the velvety cake.
Finally, play with the plate. Use a black slate or a dark wooden board to make the red and white colors pop. Scatter some extra raspberries and some dark chocolate shavings around the base to create a "forest floor" scene. It turns a simple plate of treats into a full blown Halloween experience.
Recipe FAQs
What would be a good filling for red velvet cupcakes?
Use a small dollop of the cream cheese frosting. Since the frosting is already made with cream cheese and butter, it complements the cocoa notes perfectly without needing extra ingredients.
What is the secret ingredient in red velvet cake?
The combination of buttermilk and vinegar. These acidic components react with the baking soda to create a characteristically tender crumb and a slight tang.
How far in advance can I make red velvet cupcakes?
Bake them up to two days early. Store them in an airtight container and pair them with a savory appetizer like lamb meatballs for a complete party spread.
What are common red velvet cupcake mistakes?
Overmixing the batter and overheating the cream cheese. Overmixing causes the cakes to collapse, while warm cream cheese breaks down and makes the frosting runny.
Why did my cupcakes sink in the middle?
You likely overbeat the batter. This incorporates too much air which expands rapidly in the oven and then pops, leaving a crater in the center.
How to fix runny cream cheese frosting?
Chill the frosting in the refrigerator for 30 minutes. If the consistency is still too soft, beat in a small amount of additional powdered sugar to stabilize the texture.
Is it true that red velvet is just chocolate cake with food coloring?
No, this is a common misconception. While it contains cocoa powder, the specific interaction between the buttermilk, vinegar, and baking soda creates a different flavor and texture than standard chocolate cake.
Halloween Red Velvet Cupcakes

